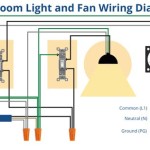
How to Vent a Bathroom Exhaust Fan Through the Soffit
Proper ventilation is crucial for maintaining a healthy and comfortable bathroom environment. A bathroom exhaust fan effectively removes moisture, odors, and pollutants, preventing mold growth, mildew, and unpleasant smells. One common and often efficient venting method involves routing the fan's exhaust through the soffit. This method offers several advantages, including discreet installation, minimal roof penetration, and potential cost savings. However, proper planning and execution are essential for ensuring its effectiveness and longevity.
Understanding Soffit Ventilation
Soffits are the horizontal panels that cover the underside of roof overhangs, providing ventilation for the attic space. When venting a bathroom exhaust fan through the soffit, the exhaust pipe is typically routed through a dedicated soffit vent or a small opening created in the soffit panel. This allows the moist air to escape from the bathroom and into the attic, where it can be further dispersed by the natural airflow within the attic space.
The effectiveness of soffit ventilation depends on several factors, including the attic's overall ventilation, the size and placement of the soffit vent, and the fan's capacity. Proper attic ventilation ensures that the air entering the attic through the soffit vent is properly exhausted, preventing moisture buildup and potential problems. The size and placement of the soffit vent must match the fan's output to ensure efficient air removal. Improper ventilation or a mismatched vent can result in moisture accumulation, leading to mold growth and other issues.
Steps for Vent Installation
Venting a bathroom exhaust fan through the soffit requires careful planning and execution to ensure optimal performance. Here are the essential steps involved:
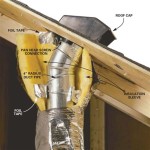
- Determine the Soffit Location: Choose a location for the soffit vent that is as close as possible to the bathroom exhaust fan. This minimizes the length of the exhaust pipe, reducing friction and ensuring efficient airflow. Consider factors like access to the attic, roof overhangs, and proximity to existing vents or obstacles.
- Measure and Cut the Exhaust Pipe: Measure the distance between the bathroom exhaust fan and the chosen soffit vent location. Cut the exhaust pipe to the appropriate length, leaving a small amount of excess for future adjustments. Use a pipe cutter or hacksaw for precise cuts.
- Install the Exhaust Pipe: Begin by attaching the fan's exhaust outlet to a section of the exhaust pipe. Use appropriate connectors and sealing tape to ensure a tight and leak-proof connection. Securely fasten the pipe to the ceiling joists or roof framing using pipe clamps, making sure the pipe has a slight upward slope to prevent condensation buildup.
- Connect the Exhaust Pipe to the Soffit Vent: Route the exhaust pipe through the chosen soffit vent location. If using a dedicated soffit vent, follow the manufacturer's instructions for installation. If creating a vent opening, cut a hole in the soffit panel and install a vent cover or grille to prevent water intrusion. Secure the exhaust pipe to the soffit vent using a pipe clamp or other appropriate fastening method.
- Seal and Insulate: Seal all joints and connections between the exhaust pipe and the fan outlet, soffit vent, and roof framing using weatherproof sealant or tape. This prevents leaks and ensures airflow efficiency. Consider adding insulation around the exhaust pipe where it passes through the attic space to prevent heat loss during cold weather.
- Test and Adjust: Once the installation is complete, run the exhaust fan and check for proper operation. Make sure there are no leaks or blockages in the system. Use a smoke pencil or incense stick to visually check for airflow and adjust the pipe angle or vent position if needed. Ensure that the fan exhausts effectively and does not create drafts or noise in the bathroom or attic.
Considerations and Best Practices
When venting a bathroom exhaust fan through the soffit, several important considerations and best practices can contribute to a successful and efficient installation:
- Ventilation Requirements: Adhere to local building codes and regulations regarding ventilation requirements for bathroom exhaust fans and soffit vents. These regulations often specify minimum fan capacity, vent size, and placement to ensure effective moisture removal and prevent attic moisture buildup.
- Fan Capacity: Select a bathroom exhaust fan that has adequate capacity for the size of the bathroom and the amount of moisture generated, especially in areas with high humidity levels. A fan's cubic feet per minute (CFM) rating should match or exceed the recommended CFM for the bathroom size.
- Attic Ventilation: Ensure adequate attic ventilation to prevent moisture buildup and maintain a healthy indoor environment. Proper attic ventilation involves balanced air intake and exhaust, typically achieved through soffit vents, gable vents, or ridge vents. This helps maintain a consistent air pressure, promoting efficient fan operation and preventing condensation from accumulating in the attic.
- Material Selection: Use high-quality, durable materials for the exhaust pipe and vent cover, resistant to moisture, temperature fluctuations, and corrosion. Consider PVC, ABS, or metal pipes for their durability and ease of installation. Opt for durable and weatherproof vent covers or grilles to prevent water intrusion and maintain proper airflow.
- Professional Installation: If unsure about the installation process or have concerns about meeting building codes, consult with a licensed electrician or HVAC professional for expert assistance. Their experience and expertise can ensure a safe and effective installation, minimizing potential problems and ensuring long-term performance.
Venting a bathroom exhaust fan through the soffit offers a practical and often efficient method for removing moisture and odors. By adhering to the steps outlined above and considering the relevant factors, homeowners can create a healthy and comfortable bathroom environment while maintaining a well-ventilated attic space.

Everbilt 4 In To 6 Soffit Exhaust Vent Sevhd The Home Depot

Ventline V2262 50 Nuova Ventola Sfiato A Soffitto Bagno Sea Luce Parti Mobili Casa

Everbilt 4 In To 6 Soffit Exhaust Vent Sevhd The Home Depot

Pin On For Erik

Bathroom Exhaust 6 Duct Adapter Da 4lan9 Scarica Il Modello Stl Gratuito Printables Com

Everbilt 4 In To 6 Soffit Exhaust Vent Sevhd The Home Depot

How To Install Ceiling Cooker Hood Luxair Brushless Motor Installation Guide

Everbilt 4 In To 6 Soffit Exhaust Vent Sevhd The Home Depot

Aerauliqa Qs 4 Inch 100mm High Quality Ceiling Ventilation Fan Installation Guide

11 Exhaust Fans Ideas Bathroom Fan
Related Posts