How To Wire A Bathroom Fan And Light Switch Diagram
Are you looking to install a bathroom fan and light switch in your bathroom? This DIY tutorial will provide you with a step-by-step guide on how to wire a bathroom fan and light switch, complete with a comprehensive diagram for easy understanding. Whether you're upgrading your existing setup or starting from scratch, we've got you covered.
1. Gather Your Materials:
Before you begin, make sure you have all the necessary materials for the installation.
- Bathroom fan
- Light fixture
- Light switch
- Electrical wire (14-gauge or 12-gauge wire recommended)
- Wire connectors (such as wire nuts or twist-on connectors)
- Electrical tape
- Screwdriver
- Pliers
- Safety glasses
2. Prepare the Wiring Route:
Determine the location of the bathroom fan and light switch. Plan the route for the electrical wiring, ensuring that the wires will reach both the fan and the switch.
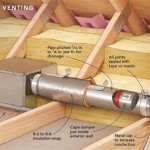
3. Install the Bathroom Fan:
Follow the manufacturer's instructions to install the bathroom fan. Typically, this involves cutting a hole in the ceiling, attaching the fan housing, and connecting the electrical wiring.
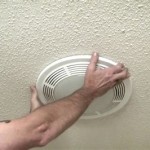
4. Install the Light Fixture:
Install the light fixture in the desired location, following the manufacturer's instructions. This usually involves attaching the mounting bracket, connecting the electrical wiring, and securing the fixture to the bracket.
5. Connect the Electrical Wiring:
Refer to the diagram provided below for guidance on connecting the electrical wiring. Generally, the following steps are involved:
- Connect the hot wire (typically black) from the power source to the light switch.
- Connect the neutral wire (typically white) from the power source to the neutral terminal on the light fixture.
- Connect the ground wire (typically green or bare) from the power source to the ground terminal on both the light fixture and the bathroom fan.
- Connect the hot wire from the light switch to the hot terminal on the bathroom fan.
- Connect the neutral wire from the light fixture to the neutral terminal on the bathroom fan.
Use wire connectors or twist-on connectors to secure the wire connections and wrap them with electrical tape for added safety.
6. Test the Installation:
Turn on the power and test the installation. Make sure that the bathroom fan and light switch are functioning properly.
7. Clean Up and Inspect:
Clean up any debris or loose wires. Inspect the installation to ensure that all connections are secure and there are no exposed wires.
Diagram:
[Insert a clear and detailed diagram here, depicting the wiring connections for the bathroom fan and light switch.]
Note: Electrical work can be dangerous if not done properly. If you're not comfortable working with electrical wiring, it's best to consult a qualified electrician.

Bookingritzcarlton Info Bathroom Fan Light Exhaust

How To Wire Bathroom Fan And Light On Separate Switches Led Lighting Info

Exhaust Fan Wiring Diagram Timer Switch

Bathroom Fan Wiring Exhaust

Extractor Fan Wiring Diywiki

Bathroom Exhaust Fan Light

How To Make Bathroom Light In Exhaust Fan Wiring Diagram Connection

Replacing A Bath Fan Switch Electronic Timing Device Electrical

Wiring Diagrams For A Ceiling Fan And Light Kit Bathroom Exhaust Home Electrical Switch

Extractor Fan Wiring Diywiki
Related Posts