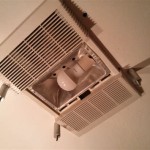
How to Wire a Bathroom Heater Exhaust Fan and Light on Separate Switches
Having separate switches for the heater, exhaust fan, and light is more convenient and energy-efficient in bathrooms. This guide provides step-by-step instructions on how to wire these components individually.
Tools and Materials Required:
- Wire strippers
- Electrical tape
- Screwdriver
- Voltmeter
- Electrical wire (14-gauge for lighting, 12-gauge for heating)
- Switch boxes
- Wall switches
- Electrical box connectors
- Bathroom heater exhaust fan
- Light fixture
Safety Precautions:
Before starting any electrical work, always ensure the power is turned off at the electrical panel. Exercise caution and follow proper safety measures to avoid electrical shocks or fires.
Step 1: Install Switch Boxes and Outlets
Install a separate switch box for each switch and an electrical box for the heater exhaust fan. Ensure the boxes are at the desired locations and firmly secured to the wall studs.
Step 2: Run Electrical Wires
From the electrical panel, run 14-gauge wire to the light switch box and 12-gauge wire to the heater exhaust fan switch box. Additionally, run wires from the switch boxes to the light fixture and heater exhaust fan, respectively.
Step 3: Connect Wires at the Light Fixture
Connect the black wire from the switch box to the black wire on the light fixture. Connect the white wire from the switch box to the white wire on the light fixture. Secure the connections with wire nuts and electrical tape.
Step 4: Connect Wires at the Heater Exhaust Fan
Connect the black wire from the switch box to the black wire on the heater exhaust fan. Connect the white wire from the switch box to the white wire on the heater exhaust fan. Connect the green ground wire to the grounding screw on the heater exhaust fan.
Step 5: Wire the Switches
Connect the black wire from the electrical panel to the brass screw on the light switch. Connect the black wire from the light fixture to the other brass screw on the light switch. Connect the white wire from the electrical panel to the silver screw on the light switch. Repeat this process for the heater exhaust fan switch.
Step 6: Test the Installation
Turn on the power at the electrical panel. Use a voltmeter to ensure the switches are functioning correctly. The light and heater exhaust fan should turn on and off independently when their respective switches are toggled.
Note: If you encounter any issues, ensure all connections are secure, refer to the manufacturer's instructions, or consult a qualified electrician.
Additional Tips:
- Use moisture-resistant electrical boxes and fittings to prevent damage from bathroom humidity.
- Install the heater exhaust fan in accordance with local building codes and manufacturer's specifications.
- Consider using dimmers for the light switch to adjust the brightness as needed.

How To Add Exhaust Fan Heater Light Fixture Combination

Exhaust Fan Wiring Diagram Timer Switch

Wiring Bathroom Exhaust Fan Light With Two Switches Doityourself Com Community Forums

Wiring Diagrams For A Ceiling Fan And Light Kit Bathroom Exhaust Home Electrical Switch

How To Wire Multi Control Rocker Switch Home Improvement Stack Exchange Light Wiring Diagram

I M Trying To Install A New Bathroom Fan Light And Night Combo The Old Switch Box Was Double Gang With

Bathroom Fan Control

Bathroom Heater Light Fan Installation Information Purchase Ie

Common Bathroom Wiring This Diagram Helped Me A Lot On My Addition Even Though The Article Is About Upg Fan Bath Home Electrical

How To Put Broan 164 Vent Light And Heater On Separate Switches
Related Posts