Installing a Bathroom Fan Timer Switch: A Comprehensive Guide
Bathroom fans play a crucial role in maintaining proper ventilation and preventing mold and mildew growth. Installing a bathroom fan timer switch can enhance the efficiency and convenience of your fan, allowing you to control its operation automatically.
Follow these steps to successfully install a bathroom fan timer switch:
1. Safety First
Turn off the power to the bathroom circuit at the electrical panel. Verify that the power is off at the light switch or fixture where the fan is connected.
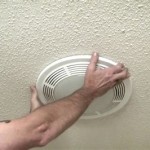
2. Remove the Existing Switch
Remove the faceplate of the existing light switch or fixture. Using a screwdriver, unscrew the switch from the electrical box and disconnect the wires.
3. Prepare the Wires
Trim any frayed wires and straighten them out. If necessary, strip off about 1/2 inch of insulation from the ends of the wires.
4. Connect the Timer Switch
Match the wires from the bathroom fan and light (if applicable) to the appropriate terminals on the timer switch, following the manufacturer's instructions. Typically, black wires connect to black, white to white, and green or bare wires to ground.
5. Mount the Timer Switch
Insert the timer switch into the electrical box and secure it with the screws provided. Ensure that the wires are securely tucked in and not pinched.
6. Install the Faceplate
Snap the faceplate onto the timer switch, ensuring it is flush with the wall.
7. Power On and Test
Turn on the power at the electrical panel. Test the timer switch by setting the desired time duration. The bathroom fan should turn on and operate accordingly.
8. Adjust Timer Settings
Once installed, you can adjust the timer settings to suit your preferences. Most timer switches allow you to set a time range from a few minutes to several hours.
Benefits of a Bathroom Fan Timer Switch
- Automated Ventilation: The fan turns on automatically when needed, ensuring proper ventilation.
- Convenience: Eliminates the need to manually turn the fan on and off, providing convenience.
- Energy Savings: The fan only operates when necessary, reducing energy consumption.
- Mold Prevention: Continuous ventilation helps prevent mold and mildew growth.
- Improved Air Quality: Removes moisture, odors, and pollutants from the bathroom.
Tips for Choosing a Timer Switch
* Time Range: Consider the desired time duration for the fan to operate. * Features: Look for switches with additional features such as a humidity sensor or night light. * Compatibility: Ensure the timer switch is compatible with your bathroom fan and wiring system. * Ease of Use: Choose a switch with a user-friendly interface for hassle-free operation. * Reviews and Ratings: Read reviews and check ratings to gauge the reliability and performance of the timer switch.
Exhaust Fan Wiring Diagram Timer Switch

Replacing A Bath Fan Switch Electronic Timing Device Electrical

Prevent Mold With The Dewstop Fan Switch Diy Family Handyman

How To Wire A Bathroom Extractor Fan With Timer Home Electrical Wiring

How To Install A Bathroom Fan Timer Switch

Bathroom Fan Wiring Exhaust

Installing A Bathroom Fan Timer Building Moxie

Extractor Fan Wiring Diywiki

How To Install A Bathroom Fan Timer Switch My Place Is Home

How To Install Bathroom Fan Timer Diy
Related Posts