Installing a Single-Handle Bathroom Sink Faucet: A Step-by-Step Guide
Installing a new bathroom sink faucet is a relatively straightforward task that can be completed in an hour or two. With a little preparation and the right tools, you can easily upgrade your bathroom's look and functionality.
Before you begin, gather the following materials:
- New single-handle bathroom sink faucet
- Adjustable wrench or basin wrench
- Plumber's putty or Teflon tape
- Screwdriver
- Bucket or bowl
Once you have all the necessary materials, follow these steps:
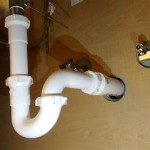
Step 1: Turn Off the Water Supply
Locate the water supply valves under the sink and turn them clockwise to close them. If there are no valves, you will need to turn off the main water supply to your home.
Step 2: Remove the Old Faucet
Use the adjustable wrench or basin wrench to loosen the nuts that hold the old faucet in place. Be careful not to overtighten the nuts, as you could damage the sink or countertop. Once the nuts are loose, pull the old faucet straight up to remove it.
Step 3: Clean the Sink Surface
Use a damp cloth to clean the surface of the sink where the new faucet will be installed. This will help to ensure a good seal.
Step 4: Apply Plumber's Putty or Teflon Tape
Apply a thin bead of plumber's putty around the base of the new faucet. If you are using Teflon tape, wrap it around the threads of the faucet's base clockwise.
Step 5: Install the New Faucet
Insert the new faucet into the hole in the sink. Align the faucet so that the handle is in the desired position. Tighten the nuts that hold the faucet in place by hand, then use the adjustable wrench or basin wrench to tighten them further.
Step 6: Connect the Water Lines
Connect the hot and cold water lines to the corresponding valves on the faucet. Use the adjustable wrench to tighten the nuts on the water lines.
Step 7: Turn on the Water Supply
Turn on the water supply valves under the sink and check for leaks. If there are any leaks, tighten the nuts on the water lines or the faucet base as needed.
Step 8: Final Adjustments
Adjust the handle of the faucet to the desired water temperature and flow rate. You may also need to adjust the aerator to achieve the desired water stream.
Congratulations! You have now successfully installed a single-handle bathroom sink faucet.

The Plumber Swap Faucet But Save Sink

Single Handle Bathroom Faucet And Drain Replacement Easy Step By Tips For Beginners

Removing And Installing Bathroom Faucets The Lazy Way Makely

P131lf Single Handle Bathroom Faucet

How To Install A Delta Single Handle Bathroom Sink Faucet Blog

How To Install A Widespread Faucet The Home Depot

Forious Single Handle 1 Or 3 Hole Waterfall Bathroom Faucet Sink Black Hh0305b The Home Depot

Bathroom Waterfall Sink Faucet Single Handle Modern Commercial Design Solid Brass

Delta Foundations Single Handle Centerset Bathroom Faucet In Chrome B501lf Com

Kohler Sundae Single Handle Hole Bathroom Faucet In Vibrant Brushed Nickel K R28795 4d Bn The Home Depot
Related Posts