Installing a Bathroom Sink P Trap: A Step-by-Step Guide
A P trap is a crucial component of any plumbing system, particularly in bathrooms. Its primary function is to prevent sewer gases from entering your home through the drain. This is achieved through a U-shaped design that holds a small amount of water, forming a seal that prevents the passage of gases. While installing a bathroom sink P trap might seem daunting, it is a relatively straightforward process that can be accomplished with the right tools and knowledge.
This article will guide you through the installation process, covering the necessary materials, tools, and techniques. By following these steps, you can successfully install a P trap for your bathroom sink, ensuring proper drainage and hygiene in your bathroom.
Gathering Supplies and Tools
Before embarking on the installation process, ensure you have the necessary materials and tools. These may include:
- A new P trap suitable for your sink size and drainpipe diameter.
- Teflon tape or pipe thread sealant.
- Adjustable wrench or pipe wrench.
- Channel-lock pliers.
- Slip-joint pliers.
- Level.
- Utility knife.
- Bucket or container for collecting excess water.
- Work gloves.
- Safety glasses.
Disconnecting the Existing P Trap
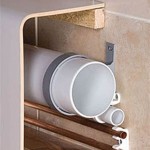
The first step is to disconnect the existing P trap. This involves carefully unscrewing the nuts connecting the P trap to the sink drain and the drainpipe. Before disconnecting, ensure to place a bucket or container beneath the P trap to collect any remaining water.
Use your adjustable wrench or pipe wrench to loosen the nuts, turning them counter-clockwise. Be careful not to overtighten or damage the threads. Once the nuts are loosened, carefully disconnect the P trap from the sink drain and the drainpipe. Take note of the order of the connections and the orientation of the P trap to facilitate the reinstallation of the new P trap.
Installing the New P Trap
With the existing P trap removed, you can now begin installing the new P trap.
Preparing the Threads
First, ensure that the threads on the new P trap, sink drain, and drainpipe are clean and free of any debris or dirt. Clean the threads using a wire brush or a cloth. Apply Teflon tape or pipe thread sealant to the threads of the P trap. This prevents leaks by creating a seal between the threaded connections. Wrap the tape clockwise around the threads, starting at the end and leaving a small gap at the end.
Connecting the P Trap
Align the P trap with the sink drain and the drainpipe. Carefully thread the P trap onto the sink drain using your adjustable wrench or pipe wrench. Tighten the nut by turning it clockwise until firmly seated. Repeat this process for the connection to the drainpipe. Ensure that the P trap is level and securely connected to both the sink drain and the drainpipe.
Testing the Installation
After installing the new P trap, it is crucial to test the connection for leaks. Slowly turn on the water supply to the sink and observe for any leaks. If you detect any leaks, tighten the connecting nuts until the leaks are resolved. If the P trap is still leaking, you may need to re-apply Teflon tape or pipe thread sealant or check for damages to the threads. Ensure the connection is secure and leak-proof before proceeding.
Safety Considerations
When working with plumbing, it is essential to prioritise safety. Follow these safety tips:
- Turn off the water supply to the sink before beginning the installation process.
- Wear work gloves and safety glasses to protect your hands and eyes.
- Be cautious with tools, as they can be sharp or heavy.
- If you encounter any difficulty or are unsure about any part of the process, consult a professional plumber.
Understanding the P Trap
The P trap plays a crucial role in maintaining sanitation and preventing unpleasant odors. It acts as a barrier, preventing sewer gases from entering the home. Its U-shaped design holds a reservoir of water that creates a seal that prevents gases from escaping.
When the sink drain is used, the water flows through the P trap and into the drainpipe. However, the U-shaped design retains a portion of water, effectively blocking any gases that could be rising from the sewer system.
The P trap also performs the function of catching debris and particles that can build up in the drainpipes. These particles can be hair, soap scum, or food particles that, if left unchecked, can eventually clog the drainpipe. The P trap acts as a barrier, capturing these particles and preventing them from reaching the drainpipes.
Conclusion
Installing a new P trap for your bathroom sink is a relatively straightforward process that can be accomplished with the right tools and techniques. By following the steps outlined in this article, you can ensure a secure and leak-free installation, maintaining proper drainage and hygiene in your bathroom. Remember to prioritize safety, consult a professional if necessary, and take pride in your DIY accomplishment.

How To Install The P Trap Under A Sink Dummies

How To Install P Trap And Bathroom Sink Drain Piping Easy Installation For Beginners

Bathroom Sink Plumbing Installation Diy Montreal

How To Install Bathroom Sink Drain Queen Bee Of Honey Dos

How To Install A P Trap For Kitchen And Bathroom Sinks

What Is A P Trap Family Handyman

How To Install Bathroom Sink Drain Queen Bee Of Honey Dos

How To Plumb A Bathroom With Multiple Plumbing Diagrams Hammerpedia

Bathroom Sink Plumbing Installation Diy Montreal

How To Connect A Bathroom Sink Drain
Related Posts