Installing a Bathroom Fan Vent Through a Roof Truss
Bathroom exhaust fans are essential for removing moisture and odors, creating a healthier and more pleasant environment. Installing a fan vent through a roof truss can be a straightforward DIY project with careful planning and execution. This article will guide you through the essential steps, providing detailed instructions and safety precautions to ensure a successful installation.
Understanding the Process
Vent pipes from an exhaust fan need to be routed to the exterior of the home to expel moisture and air. This often involves piercing through the roof. For most homes, the most convenient and efficient route is through a roof truss. Roof trusses provide structural support to the roof and offer a relatively easy access point for venting. However, it's crucial to understand the specific layout of your roof structure to ensure you're not drilling into a load-bearing element, which could compromise the integrity of the roof.
Safety Precautions: Crucial Steps Before Starting
Installing a roof vent requires working at height, which poses inherent risks. It's essential to prioritize safety throughout the project. Before embarking on the installation, take the following safety precautions:
- Secure the work area: Ensure a clear path to the roof and around the worksite. Remove any obstructions such as ladders, tools, or debris that could cause a trip hazard.
- Use appropriate safety gear: Wear a safety harness with a fall arrest system whenever working on the roof. Ensure the harness is securely anchored to a stable point. Additionally, wear gloves, safety glasses, and sturdy footwear to protect yourself from injuries.
- Check weather conditions: Avoid working on the roof during inclement weather such as rain, snow, or high winds. These conditions can increase the risk of accidents and make the installation more difficult.
Step-by-Step Installation Guide
Once the safety precautions have been implemented, you can proceed with the installation of the bathroom fan vent. Here’s a step-by-step guide:
1. Determine the Vent Location
The first step is to determine the most suitable location for the vent on the roof. Consider factors like:
- Roof slope: The vent outlet should be positioned on the sloped portion of the roof, allowing rainwater to drain away easily.
- Distance from the bathroom: The vent pipe should be as short as possible to minimize air resistance and maximize fan efficiency.
- Proximity to other vents: Avoid installing the vent directly above or below other vents to avoid interference.
- Roof truss location: Choose a spot that aligns with a roof truss for easier installation and structural integrity.
2. Locate and Mark the Truss
With the chosen location for the vent, you need to locate the roof truss that corresponds to that position. Use a stud finder or a tape measure to locate the truss. Mark the exact location on the roof where you'll be drilling.
3. Drill the Hole
Use a drill bit that's slightly larger than the diameter of the vent pipe. Drill a hole through the roof sheathing and the roof truss at the marked location. Ensure the hole is deep enough to accommodate the vent pipe and any flashing that's required.
4. Install the Flashing
Flashing is a critical component that prevents water from entering the roof through the vent hole. It's typically made of metal and forms a seal around the vent pipe. Install the flashing according to the manufacturer's instructions. Secure it to the roof with screws or nails.
5. Run the Vent Pipe
Route the vent pipe from the bathroom fan to the vent hole on the roof. Secure the pipe with clips or staples. If necessary, use elbows or other fittings to navigate around obstacles. Attach the vent pipe to the vent outlet on the roof.
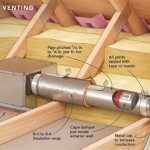
6. Seal and Insulate the Vent Pipe
Seal any gaps between the vent pipe and the roof with silicone sealant. Additionally, insulate the vent pipe to prevent condensation and improve efficiency.
7. Install the Roof Vent Cover
Attach the roof vent cover to the vent outlet on the roof. Ensure it's securely fastened and properly sealed to prevent leaks. The cover should be weather-resistant and have a screen or other method to prevent birds or other pests from entering the vent.
8. Test and Finalize
After completing the installation, test the bathroom fan to ensure it's working correctly. Check for any leaks or drafts around the vent. Make any necessary adjustments to ensure a proper seal.
While this guide provides a general overview, it's essential to consult with a qualified professional for specific instructions and guidance tailored to your home's unique configuration and local building codes.

Bathroom Vent Piping To Near Exterior Inspecting Hvac Systems Internachi Forum


Bathroom Fan Vents Improperly Placed Near Attic Roof Home Depot Heater Bathtub House Remodeling Decorating Construction Energy Use Kitchen Bedroom Building Rooms City Data Forum

How To Replace And Install A Bathroom Exhaust Fan From Start Finish For Beginners Easy Diy

Venting A Bath Fan In Cold Climate Fine Homebuilding

How To Install A Retrofit Bathroom Vent Fan

How To Install A Bathroom Fan Step By Guide Bob Vila

Bathroom Fan Into Attic Redflagdeals Com Forums

How To Install A Bathroom Fan Step By Guide Bob Vila

The 1 Reason Power Attic Ventilators Don T Help Energy Vanguard
Related Posts