Essential Tips for Installing a Moen Bathroom Faucet and Drain
When it comes to home improvement projects, installing a new bathroom faucet and drain may seem like a daunting task. However, with careful planning and the right tools, this project can be completed in a few hours.
Before embarking on this project, it's crucial to understand the essential aspects of installing a Moen bathroom faucet and drain. These aspects include the type of faucet and drain you're installing, the necessary tools and materials, and the step-by-step installation process.
This article will focus on the key elements of installing a Moen bathroom faucet and drain, providing detailed instructions and tips to ensure a successful outcome.
1. Choose the Right Faucet and Drain
The first step in installing a new faucet and drain is selecting the appropriate models that meet your needs and preferences. Consider the style, finish, and features of the faucet, ensuring they complement your bathroom decor and provide the desired functionality.
Similarly, select a drain that matches the faucet's style and finish and offers the required flow rate and clog resistance.
2. Gather Essential Tools and Materials
To install a Moen bathroom faucet and drain, you will need the following tools and materials:
- Adjustable wrench
- Basin wrench
- Plumber's putty or Teflon tape
- New faucet and drain assemblies
- Screwdriver
3. Step-by-Step Installation Guide
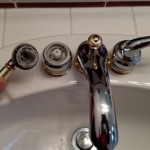
a) Remove the Old Faucet and Drain
Use the appropriate tools to disconnect the supply lines and drain assembly from the old faucet. Remove the faucet from the sink and discard the old drain.
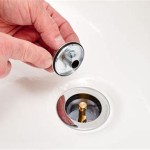
b) Install the New Drain Assembly
Apply a bead of plumber's putty or Teflon tape around the base of the drain flange. Insert the drain assembly into the drain hole and tighten the mounting nut from below.
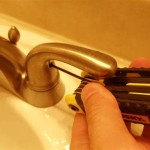
c) Install the New Faucet
Place the new faucet into the sink отверстие and secure it with the mounting nuts. Connect the supply lines to the faucet, tightening them securely.
d) Test the Installation
Turn on the water supply and check for any leaks around the faucet and drain. If leaks occur, tighten the connections as needed.
Conclusion
Installing a Moen bathroom faucet and drain can be a rewarding home improvement project with careful planning and proper execution. By considering the essential aspects discussed in this article, you can ensure a successful and lasting installation that will enhance the functionality and aesthetics of your bathroom.

Install Moen Bathroom Sink Faucet And Drain

Bathroom Faucet Drains 50 96497 Moen Solutions

How To Install A Moen Centerset Faucet

Bathroom Faucet And Drain Kit Installation Moen Eva

Diy How To Install The Moen Boardwalk Faucet Redhead Mom

Moen Liso Bathroom Faucet Install Review Costco

How To Install A New Bathroom Faucet In Pedestal Sink Moendiyer Simply Designing With Ashley

How To Install Moen Widespread Bathroom Faucets

How To Install Bathroom Faucet And Drain Moen Adler Collection

How To Install A Bathroom Faucet Moen Adler
Related Posts