Essential Aspects of Installing Moen Bathroom Faucet Drain
Installing a Moen bathroom faucet drain is a crucial step in completing your bathroom renovation or upgrade. Proper installation ensures that your faucet functions optimally and prevents leaks and other issues down the road. Understanding the essential aspects of this process is key to achieving a successful outcome.
This article will delve into the essential aspects of installing a Moen bathroom faucet drain, providing guidance on each step involved. By carefully following these steps, you can ensure a leak-free, efficient faucet that will enhance the functionality and aesthetics of your bathroom.
Choosing the Right Drain Assembly
The first step is to select the appropriate drain assembly for your Moen bathroom faucet. Moen offers a variety of drain assemblies designed to complement different faucet styles and configurations. Choose a drain assembly that matches the finish and style of your faucet to create a cohesive look.
Preparing the Sink and Faucet
Before installing the drain assembly, thoroughly clean the sink surface and the underside of the faucet. Remove any old sealant or debris that may interfere with the installation. Apply a thin bead of silicone sealant around the base of the faucet to create a watertight seal.
Installing the Drain Assembly
Insert the drain assembly into the drain hole in the sink. Align the drain assembly with the faucet base and tighten the mounting nut by hand. Use a wrench to further tighten the nut, ensuring a snug fit. Connect the drain hose to the drain assembly and secure it with a hose clamp.
Connecting the Water Supply Lines
Connect the hot and cold water supply lines to the appropriate valves on the faucet. Use two wrenches to tighten the connections, one to hold the valve and the other to tighten the supply line. Turn on the water supply and check for any leaks. If leaks occur, tighten the connections further or apply additional sealant.
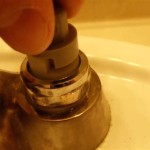
Installing the Pop-Up Stopper
Insert the pop-up stopper into the drain assembly. The stopper should fit snugly into the assembly. If it is loose, adjust the height of the stopper by turning the adjustment screw located on the underside of the assembly.
Testing the Faucet
Once the installation is complete, turn on the faucet and check for proper operation. The water should flow smoothly and the pop-up stopper should open and close easily. If any issues arise, recheck the connections and make any necessary adjustments.
Installing a Moen bathroom faucet drain is a straightforward process that can be completed with careful attention to detail. By following these essential aspects, you can ensure a successful installation that will provide years of reliable performance.

Bathroom Faucet Drains 50 96497 Moen Solutions

Install Moen Bathroom Sink Faucet And Drain

How To Install A Moen Centerset Faucet

Moen Hamden Install Vanity Faucet

Moen Lavatory Faucet And Drain Installation

Diy How To Install The Moen Boardwalk Faucet Redhead Mom

Moen 140780bg Lavatory Drain Assembly Less Overflow Build Com

How To Install A New Bathroom Faucet In Pedestal Sink Moendiyer Simply Designing With Ashley

How To Install Bathroom Faucet And Drain Moen Adler Collection

Moen 9000 M Pact 1 2 Ips Widespread Faucet Rough In Valve Build Com
Related Posts