Essential Aspects of Kohler Bathroom Sink Faucet Handle Removal
Kohler bathroom sink faucets are renowned for their durability and style. However, over time, it may become necessary to remove the handle for repairs or replacement. This guide will provide you with a step-by-step overview of the process, ensuring a successful and stress-free experience.
Materials Required
- Adjustable wrench or Allen key
- Phillips head screwdriver
- Replacement handle (if necessary)
Safety Precautions
Before you begin, it is crucial to ensure your safety. Turn off the water supply to the sink by closing the valves under the basin. Open the faucet to release any residual water.
Cover the drain with a cloth to prevent small parts from falling into the drain line.
Step-by-Step Instructions
1. Remove the CapLocate the small cap located at the base of the handle. Use a Phillips head screwdriver to remove the cap carefully.
2. Access the ScrewOnce the cap is removed, you will see a screw securing the handle to the stem. Use an Allen key or adjustable wrench to loosen the screw.
3. Lift the HandleGently lift the handle straight up to detach it from the stem. If the handle is stuck, wiggle it slightly while pulling.
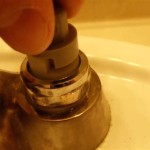
4. Remove the Stem (Optional)If you need to replace the stem, you can remove it by unscrewing the packing nut located at the base of the stem. Use an adjustable wrench to loosen the nut and pull out the stem.
5. Install the New Handle or StemIf you are replacing the handle or stem, insert the new part and tighten the screws or packing nut securely.
6. Reattach the HandleAlign the handle with the stem and press it down firmly. Tighten the screw at the base of the handle to secure it.
7. Install the CapReplace the cap at the base of the handle and tighten it with the Phillips head screwdriver.
8. Turn On Water and TestTurn on the water supply and test the faucet to ensure it is functioning correctly. Check for leaks around the handle and base.
Tips
- If the handle is stubborn, apply penetrating oil to the screw and let it sit for a few minutes before attempting to loosen it.
- Be careful not to overtighten the screws or packing nut, as this can damage the faucet.
- If you encounter any difficulties during the removal process, do not hesitate to consult a qualified plumber.
Conclusion
Removing a Kohler bathroom sink faucet handle is a relatively simple task that can be completed in a short amount of time. By following the instructions outlined above, you can successfully remove the handle for repairs or replacement and enjoy a fully functional sink.
Remember, if you are unsure about any aspect of the process, it is always advisable to seek professional assistance to avoid potential damage to the faucet or plumbing system.

Kohler Faucet Replace Spline Insert

How To Remove Kohler Bathroom Faucet Handle Melted Stories

Remove The Handles For Devonshire Bathroom Faucet

Replacing A Bathroom Faucet Fine Homebuilding

How To Remove Kohler Bathroom Faucet Cartridge Bargain

How To Fix A Leaking Faucet Handle Replacing Stem Assembly

Kohler Wide Spread Taboret Lavatory Faucet Stems Replaced

How To Remove Faucet Handles Without S Upgradedhome Com

How To Fix Leaky Bathroom Faucet Kohler Two Handle

How To Remove A Single Stem Kohler Kitchen Faucets Infinity
Related Posts