Kohler Bathroom Sink Faucet Installation Instructions: A Step-by-Step Guide
Upgrading your bathroom with a new Kohler sink faucet is a great way to enhance its style and functionality. While professional installation is always recommended, many homeowners find it relatively straightforward with the right tools and a bit of patience. Here's a comprehensive guide to help you through the process effortlessly.
Tools and Materials
Before you begin, gather the necessary tools and materials:
- Kohler sink faucet
- Adjustable wrench
- Pliers
- Basin wrench
- Teflon tape
- Plumber's putty
- Rag or towel
Step 1: Turn Off Water Supply
Safety first! Shut off the water supply to your bathroom sink by turning off the valves located under the sink. If you cannot find the valves, you may need to turn off the main water supply to your home.
Step 2: Remove Old Faucet
Use the adjustable wrench and pliers to disconnect the supply lines from the old faucet. Then, use the basin wrench to loosen and remove the mounting nuts holding the faucet to the sink. Carefully lift the old faucet out of the sink.
Step 3: Prepare the New Faucet
Apply Teflon tape to the threads of the new faucet's mounting nuts and supply lines. This will help prevent water leaks.
Step 4: Install the New Faucet
Position the new faucet over the sinkholes and insert the mounting nuts from below. Tighten the nuts securely using the adjustable wrench or pliers.
Step 5: Connect the Supply Lines
Screw the supply lines onto the corresponding water supply valves. Ensure that the hot and cold lines are connected correctly.
Step 6: Apply Plumber's Putty
Apply a bead of plumber's putty around the base of the faucet where it meets the sink surface. This will create a watertight seal.
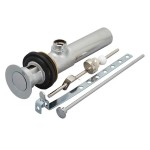
Step 7: Install Drain Assembly (if applicable)
If your faucet includes a drain assembly, follow the manufacturer's instructions to install it.
Step 8: Turn on Water Supply and Check for Leaks
Turn on the water supply valves and check for any leaks. If you notice any leaks, tighten the connections or apply additional Teflon tape as needed.
Step 9: Adjust Faucet Handles
Adjust the faucet handles to ensure smooth operation and desired water temperature.
Congratulations! You have successfully installed your Kohler bathroom sink faucet. Enjoy the improved style and functionality it brings to your space.

Installation Instructions Kohler

Dimensions And Measurements Kohler

Installation Instructions Nateo Kitchen Mixer Kohler New Zealand

Kohler Numista 8 In Widespread 2 Handle Bathroom Faucet Vibrant Brushed Nickel K R26585 4d Bn The Home Depot

Installation Willamette Widespread Bathroom Sink Faucet

Kohler Faucet Installation

Kohler Mistos Battery Powered Touchless Single Hole Bathroom Faucet In Matte Black K R32930 4d Bl The Home Depot

How To Install A 3 Piece Kohler Faucet

Kohler Ealing Vibrant Brushed Nickel Single Hole 4 In Centerset 1 Handle Watersense Bathroom Sink Faucet With Drain And Deck Plate The Faucets Department At Com

Kohler K 14406 3 Purist Widespread Bathroom Sink Faucet With Cross Han Signature S By General Plumbing Supply
Related Posts