Essential Aspects of Moen Bathroom Faucet Aerator Repair
Maintaining the functionality and efficiency of your bathroom faucet is crucial, and a well-maintained aerator is essential to ensure optimal performance. Moen's bathroom faucets are renowned for their durability and quality, and repairing the aerator is a relatively simple task. This article will delve into the essential aspects of Moen bathroom faucet aerator repair, providing a comprehensive guide to help you restore your faucet to its optimal condition.
Before embarking on the repair process, it's important to understand the anatomy of your Moen bathroom faucet aerator. Typically, it consists of three components: an outer shell, a flow restrictor or aerator insert, and a rubber washer or seal. The aerator insert is responsible for diffusing the water flow, creating a smooth and aerated stream.
Tools Required
- Adjustable wrench
- Phillips head screwdriver
- Aerator removal tool (optional)
Step-by-Step Repair Guide
- Turn off the water supply: Before starting any work, turn off the water supply to the faucet under the sink or through the main shut-off valve.
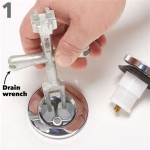
- Remove the aerator: Use an adjustable wrench or aerator removal tool to gently unscrew the aerator from the faucet spout. Be careful not to overtighten or damage the aerator.
- Inspect the aerator components: Once the aerator is removed, inspect its components for any signs of wear, corrosion, or debris. If the flow restrictor is clogged, it may need to be replaced.
- Clean the components: Use a soft brush or cloth to remove any debris or mineral deposits from the aerator components. Rinse the components thoroughly with clean water.
- Replace the flow restrictor (optional): If the flow restrictor is clogged or damaged beyond repair, it should be replaced with a new one. Insert the new flow restrictor into the aerator shell.
- Reassemble the aerator: Place the rubber washer or seal inside the aerator shell, then screw the outer shell onto the flow restrictor. Ensure the components are snugly fit.
- Reinstall the aerator: Hand-tighten the aerator back onto the faucet spout. Avoid using excessive force.
- Turn on the water supply: Turn on the water supply to the faucet and check for any leaks. If any leaks occur, tighten the aerator further or replace the rubber washer.
Maintenance Tips
Regular maintenance is essential to ensure the longevity of your Moen bathroom faucet and aerator. Here are some helpful tips:
- Clean the aerator monthly to remove any debris or mineral buildup.
- Replace the aerator every 6-12 months, depending on water quality and usage.
- Avoid using abrasive cleaners or chemicals on the aerator.
Conclusion
Repairing a Moen bathroom faucet aerator is a straightforward task that can be easily accomplished with a few simple tools and a bit of attention to detail. By following the steps outlined in this article and adhering to the maintenance tips provided, you can restore your faucet to its optimal functionality and enjoy a smooth, aerated water flow.

How To Replace A Faucet Aerator Repair And

Fixing A Faucet Aerator You Can Be Diy R Too The Kim Six Fix

Moen Eva 6410 Faucet Aerator Upgrade Replacement Repair 137401

Cleveland Faucet Group Part 180158 1 2 Gpm Moen Aerator Kit Includes Key Inserts Home Depot Pro

Moen Eva 4 In Centerset 2 Handle High Arc Bathroom Faucet Brushed Nickel 6410bn The Home Depot

Moen Eva 6410 Faucet Aerator Upgrade Replacement Repair 137401

Moen Eco Performance Standard Aerator In The Faucet Aerators Department At Com

Moen Aerator Kit In Chrome Com

Fixing A Faucet Aerator You Can Be Diy R Too The Kim Six Fix

Neoperl M21 5x1 5 Pca 1 2 Gpm Moen Water Saving Aerator With Key 37 0357 98 The Home Depot