Moen Bathroom Sink Stopper Repair: A Comprehensive Guide
A malfunctioning sink stopper can be a frustrating plumbing issue. This guide provides a comprehensive overview of troubleshooting and repairing Moen bathroom sink stoppers, empowering homeowners to address common problems and potentially avoid costly plumbing services.
Identifying the Moen Sink Stopper Type
Moen utilizes a few different stopper designs. Accurate identification of the stopper type is crucial for effective repair. The most common types include:
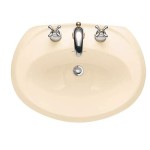
*Lift-and-Turn:
This traditional style features a knob on the sink deck that rotates to raise and lower the stopper. *Push-and-Seal:
These stoppers operate with a simple push to close and another push to open the drain. *Pop-up:
Operated by a lever behind the faucet, pop-up stoppers are less common in modern Moen sinks.Once the stopper type is identified, the appropriate repair methods can be implemented.
Common Moen Sink Stopper Problems
Several issues can plague Moen sink stoppers, ranging from simple clogs to more complex mechanical failures. Understanding the root cause is essential for effective repair.
*Clogged Drain:
Hair, soap scum, and other debris can accumulate in the drain, preventing the stopper from sealing properly. *Loose Connection:
The linkage connecting the stopper to the drain mechanism can become loose or disconnected, hindering operation. *Broken Stopper:
Physical damage to the stopper itself, such as cracks or broken pieces, can necessitate replacement. *Worn-out Gasket:
The gasket that creates a seal between the stopper and the drain can wear out over time, leading to leaks. *Faulty Lift Rod:
In pop-up assemblies, a bent or broken lift rod can prevent the stopper from functioning correctly.Tools Required for Repair
Gathering the necessary tools beforehand streamlines the repair process. While specific tools may vary depending on the repair, some common tools include:
*Pliers:
Needle-nose pliers and adjustable pliers are helpful for gripping and manipulating small parts. *Screwdriver:
A flathead screwdriver or Phillips head screwdriver, depending on the stopper type, is often needed. *Allen Wrench:
Some Moen stoppers utilize Allen screws for assembly. *Drain Cleaner:
Chemical drain cleaners or a drain snake can be used to clear clogs. *Flashlight:
A flashlight is useful for illuminating the drain assembly and identifying the problem.Troubleshooting and Repairing a Lift-and-Turn Stopper
Lift-and-Turn stoppers are commonly found in older Moen sinks. Repairs often involve tightening or replacing the pivot nut.
*Remove the Stopper:
Unscrew the knob by turning it counterclockwise. This should release the stopper assembly. *Inspect the Pivot Nut:
Locate the pivot nut beneath the sink. This nut secures the stopper linkage. Check for looseness. *Tighten or Replace the Pivot Nut:
Tighten the pivot nut with pliers if loose. If the nut is damaged, replace it with a new one. *Reassemble the Stopper:
Insert the stopper back into the drain and reattach the knob.Troubleshooting and Repairing a Push-and-Seal Stopper
Push-and-Seal stoppers are known for their simplicity. Repair typically involves cleaning or replacing the stopper assembly.
*Remove the Stopper:
Push down firmly on the stopper to release it from the drain. *Clean the Stopper and Drain:
Remove any debris or buildup from the stopper and the drain opening. *Inspect the Seal:
Check the rubber seal around the stopper for damage. Replace the stopper if the seal is worn. *Reinstall the Stopper:
Insert the stopper back into the drain and press down to secure it.Troubleshooting and Repairing a Pop-up Stopper
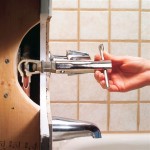
Pop-up stoppers involve a more complex mechanism. Repair often focuses on the lift rod and clevis strap.
*Access the Pop-up Assembly:
Locate the clevis strap and lift rod under the sink. *Inspect the Lift Rod and Clevis Strap:
Check for any bends or breaks in the lift rod or damage to the clevis strap. *Adjust or Replace Components:
If the lift rod is bent, attempt to straighten it. Replace the lift rod or clevis strap if necessary. *Check the Pivot Nut:
Ensure the pivot nut connecting the lift rod to the drain stopper is secure.Preventing Future Problems
Proactive maintenance can prevent future sink stopper issues. Simple steps include:
*Regular Cleaning:
Periodically clean the drain with a drain cleaner or baking soda and vinegar to prevent clogs. *Avoid Harsh Chemicals:
Refrain from using harsh chemical drain cleaners that can damage the stopper and drain. *Hair Catcher:
Use a hair catcher in the drain to prevent hair from clogging the drain.By following these troubleshooting and repair tips, homeowners can often resolve Moen bathroom sink stopper problems efficiently and effectively.

Moen Oil Rubbed Broe Bathroom Sink Drain Kit In The Drains Stoppers Department At Com

Moen Replacement Drain Oil Rubbed Broe Bathroom Sink Stopper In The Drains Stoppers Department At Com

Moen 10790 Lavatory Pop Up Waste Assembly Chrome Faucetdepot Com

Easy Moen Bathroom Faucet Drip Repair

Pacific Plumbing Supply Company Moen Pivot Rod And Clip Assembly For 10790 99500 Bathroom Sink Drain

Moen Cau 4 In Centerset Single Handle Low Arc Bathroom Faucet With Metal Drain Assembly Red Blue Under Spout Chrome L4621 The Home Depot

How To Remove Bathroom Sink Drain Collar Stopper Plumbing Moen Faucets

Moen Chrome Bathroom Sink Pop Up Drain Kit At Com

Bathroom Faucet Cartridge Replacement

Diy How To Install The Moen Boardwalk Faucet Redhead Mom
Related Posts