Essential Aspects of Moen Bathroom Sink Stopper Replacement
Maintaining a clean and functional bathroom involves regular upkeep of its fixtures, including the sink stopper. Moen bathroom sink stoppers are renowned for their durability and ease of use. However, like any other component, they may require replacement over time. This guide will provide you with the essential steps and considerations for a successful Moen bathroom sink stopper replacement.
Identifying the Correct Replacement Stopper
Before embarking on the replacement process, it is imperative to identify the correct replacement stopper for your Moen bathroom sink. There are various types of stoppers available, designed for specific sink models and drain configurations. To ensure compatibility, refer to the manufacturer's instructions or consult with a plumbing professional.
Gathering the Necessary Tools
Replacing a Moen bathroom sink stopper requires a few basic tools. These include: - Adjustable wrench or pliers - Screwdriver (optional) - Plumber's putty (optional)
Step-by-Step Replacement Process
Follow these steps to replace the Moen bathroom sink stopper:
- Turn off the Water Supply: Shut off the water supply to the sink by closing the valves beneath the sink or at the main water shut-off valve.
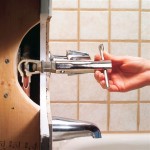
- Remove the Existing Stopper: Using an adjustable wrench or pliers, unscrew the existing stopper from the drain. Some stoppers may have a small set screw that needs to be loosened first.
- Clean the Drain: Remove any debris or residue from the drain using a damp cloth or sponge.
- Apply Plumber's Putty (Optional): Apply a thin layer of plumber's putty around the base of the new stopper's gasket to create a watertight seal.
- Install the New Stopper: Position the new stopper in the drain and hand-tighten it. Use the adjustable wrench or pliers to securely tighten the stopper.
- Tighten the Set Screw (If Applicable): Some stoppers have a set screw to hold the stopper in place. If present, tighten the set screw using a screwdriver.
- Turn on the Water Supply: Slowly turn on the water supply and check for leaks around the stopper.
Tips for a Smooth Replacement
Consider these tips for a smoother Moen bathroom sink stopper replacement:
- If the stopper is difficult to remove, apply a small amount of penetrating oil to the threads and let it sit for a few minutes before attempting to unscrew it.
- Be gentle when tightening the stopper, as overtightening can damage the threads.
- If you notice any leaks after replacing the stopper, tighten the set screw further or apply additional plumber's putty.
By following these steps and considering the provided tips, you can successfully replace a Moen bathroom sink stopper and ensure proper drainage and a fresh, functional bathroom.

Moen Replacement Drain Oil Rubbed Broe Bathroom Sink Stopper In The Drains Stoppers Department At Com

Moen Sink Drains Stoppers At Com

Moen 10709bc Replacement Drain Assembly With Plug And Seat Build Com

Moen Lift N Drain Tub Assembly 101653 The Home Depot

Moen 10790 Lavatory Pop Up Waste Assembly Chrome Faucetdepot Com

Danco 1 In Plastic Pop Up Stopper For Moen Chrome 88994 The Home Depot

Moen Oil Rubbed Broe Bathroom Sink Drain Kit In The Drains Stoppers Department At Com

Lavatory Drains Moen Solutions

Larsen Bathroom Sink Pop Up Stopper Chrome For Moen 4 7 8 In Long Killingworth True Value

Pacific Plumbing Supply Company Moen Pivot Rod And Clip Assembly For 10790 99500 Bathroom Sink Drain
Related Posts