Essential Aspects of Moen Tilson Single Handle Bathroom Faucet In Brushed Nickel Installation
Upgrading your bathroom faucet with the Moen Tilson Single Handle Bathroom Faucet in Brushed Nickel is an excellent way to elevate the style and functionality of your space. This guide will provide you with comprehensive instructions on every step of the installation process, ensuring a successful and satisfactory outcome.
Gather Necessary Tools and Materials:
Before commencing the installation, ensure you have all the necessary tools and materials at hand. These typically include:
- Adjustable wrench
- Basin wrench
- Plumber's putty
- New faucet
- Teflon tape
- Screwdriver
Step 1: Shut Off Water Supply and Remove Old Faucet
Begin by turning off the water supply valves located under the sink. Then, use the basin wrench to loosen and remove the nuts securing the old faucet to the sink.
Step 2: Disassemble Old Faucet
Detach the water supply lines from the old faucet, using an adjustable wrench to loosen the nuts. Once the lines are disconnected, lift the old faucet out of the sink.
Step 3: Prepare the Sink and New Faucet
Clean and dry the surface where the new faucet will be installed. Apply a thin layer of plumber's putty around the base of the new faucet.
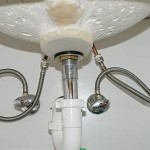
Step 4: Install Faucet and Water Supply Lines
Insert the new faucet into the sink opening and secure it with the mounting nuts. Ensure the rubber washer is in place between the faucet and the sink. Tighten the nuts with a basin wrench, but do not overtighten.
Connect the water supply lines to the new faucet. Wrap the threads of the lines with Teflon tape for a watertight seal.
Step 5: Install Handle and Aerator
Install the handle by inserting it into the stem and securing it with the included screw. Next, screw on the aerator to the end of the spout.
Step 6: Turn on Water and Check for Leaks
Turn on the water supply valves and check for any leaks. If leaks occur, tighten the connections as necessary.
Step 7: Finishing Touches
Remove any excess plumber's putty and clean the faucet with a soft cloth. Your new Moen Tilson Single Handle Bathroom Faucet in Brushed Nickel is now installed and ready to use.
Additional Tips:
- If you encounter any difficulties, do not hesitate to consult a professional plumber.
- Always follow the manufacturer's instructions for specific installation requirements.
- Ensure the water temperature is set before using the faucet.
Congratulations! You have successfully installed your Moen Tilson Single Handle Bathroom Faucet in Brushed Nickel. Enjoy the enhanced style and functionality of your upgraded bathroom.

Moen Tilson Spot Resist Brushed Nickel Bathroom Faucet With Optional Deck Plate 84565srn Com

Moen Tilson Chrome Bathroom Sink Faucet With Optional Deck Plate 84565 Com

Moen Tilson Spot Resist Brushed Nickel Bathroom Faucet With Optional Deck Plate 84565srn Com

Moen Tilson One Handle High Arc Bathroom Faucet Costco

Tilson Chrome One Handle High Arc Bathroom Faucet 84565 Moen

Moen 6702bn Brushed Nickel One Handle Bathroom Faucet Com

Moen Danika Single Handle High Arc Bathroom Sink Faucet Watersense Certified Brushed Nickel Canadian Tire

Moen Liso Single Handle Bathroom Faucet 84540srn Brushed Nickel Finish New

Moen Genta Brushed Nickel Two Handle Bathroom Sink Faucet 8 In Com

Tilson Chrome One Handle High Arc Bathroom Faucet 84565 Moen
Related Posts