Replacing Your Porcelain Bathroom Sink: A Comprehensive Guide
Are you looking to update your bathroom with a new porcelain sink? While replacing a bathroom sink may seem like a daunting task, it's actually a relatively easy project that can be completed in a few hours. Here's a comprehensive guide to help you get started.
Materials Required:
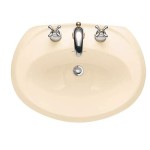
- New porcelain sink
- Basin wrench
- Pliers
- Plumber's putty
- Faucet
- Drain assembly
- Silicone caulk
Safety First:
Before you start working, be sure to turn off the water supply to the bathroom. You can do this by closing the shut-off valves under the sink or by turning off the main water supply to the house.
Removing the Old Sink:
To remove the old sink, start by disconnecting the water supply lines. Use a basin wrench to loosen the nuts that connect the lines to the faucet. Once the lines are disconnected, you can remove the faucet by unscrewing the nuts that hold it in place. Next, disconnect the drain assembly by unscrewing the nuts that hold it to the sink. Finally, you can remove the old sink by lifting it up and off the countertop.
Preparing the New Sink:
Before you install the new sink, apply a bead of plumber's putty around the rim of the drain hole. This will help to create a watertight seal. Next, insert the new drain assembly into the drain hole and tighten the nuts to secure it. Place the new sink on the countertop and align it with the drain hole. Gently press down on the sink to seat it in the putty.
Installing the Faucet and Drain:
Now, you can install the new faucet. Insert the faucet into the holes in the sink and tighten the nuts to secure it. Connect the water supply lines to the faucet and tighten the nuts. Turn on the water supply and check for leaks. Finally, install the pop-up drain by inserting it into the drain hole and tightening the nut to secure it.
Sealing the Sink:
To prevent water from seeping between the sink and countertop, apply a bead of silicone caulk around the edges of the sink. Use your finger or a caulk tool to smooth out the caulk and create a watertight seal. Allow the caulk to dry completely before using the sink.
Enjoy Your New Sink:
Congratulations! You have now successfully replaced your porcelain bathroom sink. With proper care and maintenance, your new sink will provide years of use.

How To Repair A Porcelain Sink Cosmos Surfaces

Gorgeous Shiny Things How To Repair A Porcelain Sink

Ceramic Porcelain Sink Repair True Value

Porcelain Bathroom Sinks At Com

Porcelain Sink Easy Installation Method

Bathroom Sink Guide

Kraus Elavo 16 3 4 In Oval Porcelain Ceramic Undermount Bathroom Sink White With Overflow Drain Kcu 273 The Home Depot

Drop In Bathroom Sink Replacement

Logmey 24 In Modern Bathroom Oval Vessel Sink White Porcelain Ceramic Art Basin H Lmp18007 The Home Depot

How To Patch A Porcelain Sink Himg Surface Repair
Related Posts