Essential Aspects of Removing a Bathroom Sink
Removing a bathroom sink is a relatively simple plumbing task that can be completed in a few hours. However, it is important to carefully follow all of the steps to avoid damaging the sink or the plumbing. In this article, we will discuss the essential aspects of removing a bathroom sink, including safety precautions, tools and materials needed, and step-by-step instructions.
Before you begin, it is important to take some safety precautions. First, turn off the water supply to the sink. Next, open the faucet to release any remaining water in the lines. Finally, put on safety glasses and gloves to protect yourself from any debris or chemicals.
To remove a bathroom sink, you will need the following tools and materials:
- Adjustable wrench
- Pliers
- Screwdriver
- Bucket
- Plumber's putty
- New sink
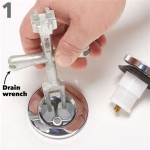
Once you have gathered your tools and materials, you can begin the removal process. First, disconnect the water supply lines from the sink. Use an adjustable wrench to loosen the nuts on the water supply lines, and then pull the lines off of the sink. Next, disconnect the drain line from the sink. Use a pair of pliers to loosen the nuts on the drain line, and then pull the line off of the sink.
Once the water supply lines and drain line have been disconnected, you can remove the sink from the countertop. First, remove the screws that are holding the sink in place. Next, carefully lift the sink up and off of the countertop. Be careful not to damage the sink or the countertop.
Now that the sink has been removed, you can install the new sink. First, apply a bead of plumber's putty around the rim of the new sink. Next, place the new sink in the hole in the countertop. Finally, tighten the screws that are holding the sink in place. Once the new sink has been installed, you can reconnect the water supply lines and drain line. First, connect the water supply lines to the new sink. Use an adjustable wrench to tighten the nuts on the water supply lines. Next, connect the drain line to the new sink. Use a pair of pliers to tighten the nuts on the drain line. Finally, turn on the water supply to the sink and check for leaks. If there are any leaks, tighten the nuts on the water supply lines or drain line until the leaks stop.
Removing a bathroom sink is a relatively simple plumbing task that can be completed in a few hours. By following the steps outlined in this article, you can safely and easily remove your old sink and install a new one.

How To Remove A Bathroom Sink Diy Projects

How To Remove A Bathroom Sink Diy Projects

How To Remove A Bathroom Vanity Budget Dumpster

How To Remove And Replace A Bathroom Sink Diy

How To Remove A Bathroom Sink Diy Projects

Diy Guide Find Out How To Replace A Bathroom Sink Ron Hazelton

How To Remove And Install A Bathroom Faucet

How To Fit A Bathroom Sink Diy Guides Victorian Plumbing

How To Replace A Bathroom Faucet Home Repair Tutor

How To Remove Bathroom Vanity Cabinet Step By Guide
Related Posts