Repairing a Delta Bathroom Faucet: A Comprehensive Guide
Delta bathroom faucets are known for their durability and style. However, even the most reliable fixtures can develop problems over time. If your Delta bathroom faucet is leaking, dripping, or not functioning properly, don't panic. With a few simple tools and a little know-how, you can repair it yourself and save money on a plumber.
Identifying the Problem
The first step to repairing a Delta bathroom faucet is to identify the problem. This can be done by observing the symptoms and determining which component is malfunctioning. Common problems include:
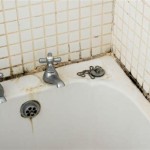
- Leaking from the base of the faucet
- Dripping from the spout
- Difficulty turning the handles
- No water flow
- Loud noises when operating the faucet
Tools and Materials
Once you have identified the problem, you will need to gather the necessary tools and materials. These may include:
- Phillips head screwdriver
- Adjustable wrench
- Allen wrench (if required)
- Replacement parts (if necessary)
Step-by-Step Repair Guide
Once you have assembled the necessary tools and materials, follow these step-by-step instructions to repair your Delta bathroom faucet:
1. Shut off the Water SupplyBefore beginning any repairs, be sure to shut off the water supply to the faucet. This is typically done by turning off the valves beneath the sink.
2. Disassemble the FaucetRemove the aerator from the spout using a wrench or pliers. Then, use a Phillips head screwdriver to remove the handle screws and pull off the handles. Finally, use an adjustable wrench to disconnect the supply lines from the faucet.
3. Replace the Cartridge or StemIf the faucet is leaking from the base, you will need to replace the cartridge or stem. Use a screwdriver or Allen wrench to unscrew the cartridge or stem assembly. Then, carefully remove the old cartridge or stem and replace it with a new one.
4. Replace the O-RingsIf the faucet is leaking from the handles, you may need to replace the O-rings. Use a screwdriver or pliers to remove the old O-rings and replace them with new ones.
5. Reassemble the FaucetOnce you have replaced the necessary parts, reassemble the faucet by reversing the disassembly steps. Tighten all connections securely using an adjustable wrench.
6. Turn on the Water SupplyTurn on the water supply valves beneath the sink and check for any leaks. If there are no leaks, your Delta bathroom faucet is now repaired.
Tips for Preventing Future Repairs
Follow these tips to help prevent future repairs to your Delta bathroom faucet:
- Clean the faucet regularly with a mild detergent and water.
- Avoid using harsh chemicals or abrasive cleaners on the faucet.
- Do not overtighten the handles or other components.
- Call a plumber if you are experiencing any major problems with the faucet.
By following these tips, you can keep your Delta bathroom faucet functioning properly for years to come.

Delta Bathroom Faucet Repair Seats And Springs Serramar Hoa

Sink Faucet Repair Delta Bathroom Drips

Repair Kit Bathroom Rp77739 Delta Faucet

Simple Ways To Fix A Leaky Delta Bathroom Sink Faucet

Repair Kit Bathroom Rp77738 Delta Faucet

Delta Faucet Repair Parts In 2024 Bathroom

Repair Parts For One And Two Handle Delta Bathroom Faucets

Delta Faucet Repair Parts Faucets Bathroom

Repairing A Leaky Delta Bath Or Shower Faucet Single Lever And Setting Temp

Delta Faucet Repair Kit True Value