Repair Delta Bathroom Faucet Drip: A Comprehensive Guide
A dripping bathroom faucet is a common issue that can waste water and increase your utility bills. While it may seem like a minor inconvenience, it's important to address the problem promptly to prevent further damage and costly repairs. Repairing a Delta bathroom faucet drip is relatively straightforward and can be done with a few basic tools.
In this comprehensive guide, we will provide step-by-step instructions on how to identify and repair a dripping Delta bathroom faucet. We will cover the essential aspects of the process, including:
- Identifying the source of the drip
- Gathering the necessary tools
- Disassembling the faucet
- Replacing the worn or damaged parts
- Reassembling the faucet
By following these steps carefully, you can successfully repair your Delta bathroom faucet and restore it to proper working order.
Identifying the Source of the Drip
The first step in repairing a dripping Delta bathroom faucet is to identify the source of the leak. Look for a small, steady stream of water coming from any part of the faucet, such as the handle, spout, or base.
If the drip is coming from the handle, it's likely due to a worn or damaged washer or O-ring. If the drip is coming from the spout, it could be caused by a faulty cartridge or aerator.
Gathering the Necessary Tools
Once you've identified the source of the drip, you can gather the necessary tools for the repair. You will typically need:
- Adjustable wrench
- Phillips head screwdriver
- Flathead screwdriver
- Replacement parts (if needed)
Replacement parts for Delta bathroom faucets can be purchased at most hardware stores or online retailers.
Disassembling the Faucet
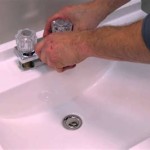
Turn off the water supply to the faucet using the shut-off valves located under the sink. Remove the aerator by unscrewing it from the end of the spout using a wrench or pliers. Grip the handle and pull it straight up to remove it from the faucet.
Use a screwdriver to remove the screws that hold the handle assembly in place. Carefully lift the handle assembly off the faucet. You may need to use a wrench to loosen the packing nut that holds the cartridge in place.
Replacing the Worn or Damaged Parts
Inspect the washer or O-ring for damage or wear. If necessary, replace the worn or damaged parts with new ones.
If the drip is coming from the cartridge, you will need to replace the cartridge. To do this, pull the old cartridge straight up and out of the faucet. Align the new cartridge with the valve body and push it into place.
Reassembling the Faucet
Thread the packing nut back onto the faucet and tighten it using a wrench. Replace the handle assembly and secure it with the screws.
Replace the aerator by screwing it back onto the end of the spout. Turn on the water supply and check for any leaks. If there are no leaks, your faucet is successfully repaired.

How To Repair Leaking Dripping Delta Faucet Diyplumbing Serviceplumbing Tappplumbing

Sink Faucet Repair Delta Bathroom Drips

Simple Ways To Fix A Leaky Delta Bathroom Sink Faucet

How To Fix A Leaky Delta Style Bathroom Faucet

Simple Ways To Fix A Leaky Delta Bathroom Sink Faucet

How To Repair Leaking Dripping Delta Faucet Diyplumbing Serviceplumbing Tappplumbing

How To Fix A Leaky Bathtub Faucet Delta Shower Cartridge L Replace Installing

My 1300 1400 Series Monitor Is Leaking From The Shower Head Or Spout When Handle Off What Do I Need

How To Fix Leaky Bathroom Handle Delta Faucet Model 4530 Series Hard Water

How To Fix A Leaking Bathroom Faucet Quit That Drip
Related Posts