Repairing a Leaky American Standard Bathroom Faucet: A Comprehensive Guide
A leaky faucet can be a frustrating and wasteful issue in any bathroom. If you have an American Standard bathroom faucet that's dripping, it's essential to repair it promptly to prevent water damage and excessive water bill charges. This guide will walk you through the essential aspects of repairing a leaky American Standard bathroom faucet, providing step-by-step instructions and helpful tips.
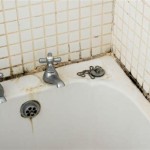
Identifying the Leak Source:
Before you start repairing your faucet, it's crucial to identify the source of the leak. Look for any visible cracks or loose connections around the faucet handle, spout, or base. Check the aerator, which is the small screen at the tip of the spout, as it can sometimes become clogged or damaged, leading to a leak. Once you have located the source, you can gather the necessary tools and materials for the repair.
Tools and Materials:
To repair a leaky American Standard bathroom faucet, you will need the following:
- Allen wrench or hex key
- Screwdriver (Phillips or flathead, depending on the faucet model)
- Adjustable wrench
- Faucet repair kit (which may include washers, O-rings, and seals)
- Plumber's tape
- Clean cloth or rag
Step-by-Step Repair Instructions:
1. Shut Off the Water Supply:
Locate the water supply valves beneath the sink and turn them off to cut off the water flow to the faucet. Open the faucet handles to release any remaining water from the lines.
2. Remove the Faucet Handle:
Using the Allen wrench or hex key, remove the screws holding the faucet handle in place. Carefully lift off the handle and set it aside.
3. Replace the Cartridge:
Once the handle is removed, you will access the cartridge, which is the primary component responsible for controlling water flow through the faucet. Use the screwdriver to remove any screws holding the cartridge in place. Gently pull the cartridge straight up and out of the faucet body. Insert the new cartridge into the faucet body and secure it with the screws.
4. Replace the O-Rings and Washers:
Inside the faucet body, you may find various O-rings and washers that can wear out over time. Inspect these components for signs of damage or deterioration. Replace any faulty O-rings or washers with new ones from the repair kit.
5. Apply Plumber's Tape:
Before reattaching the faucet handle, wrap a few layers of plumber's tape around the threads of the cartridge, spout, or any other threaded connections. This will create a watertight seal and prevent future leaks.
6. Reassemble the Faucet:
Reattach the faucet handle and tighten the screws to secure it. Connect the spout or any other components that were removed during the repair. Tighten all connections using the adjustable wrench or pliers.
7. Turn On the Water Supply:
Slowly turn on the water supply valves beneath the sink. Check for any leaks around the faucet. If there are no leaks, your repair is complete.
Tips:
- If you are uncomfortable repairing the faucet yourself, contact a licensed plumber for assistance.
- Use high-quality replacement parts to ensure a durable repair.
- Regularly inspect your faucet for any signs of leaks or damage to prevent future problems.
- If the leak persists after following these steps, seek professional help.
By following these thorough instructions and utilizing the provided tips, you can successfully repair a leaky American Standard bathroom faucet. This will not only save you from water waste and high water bills but also enhance the functionality and aesthetics of your bathroom.

How To Fix A Leaking American Standard Faucet

How To Replace A Leaking Bathroom Faucet Cartridge

How To Repair Dripping American Standard Faucet In Bathroom Part 2

How To Repair Dripping American Standard Bathroom Faucet Handle Part 3

How To Repair Dripping American Standard Bathroom Faucet Handle Part 1

How To Repair Dripping American Standard Bathroom Faucet Handle Part 2

How To Fix Leaky American Standard Kitchen Faucet Infinity

How To Fix A Leaky 2 Handle Faucet High Arc Bathroom Low Contemporary Faucets

How To Replace A Leaking Bathroom Faucet Cartridge

How To Fix Leaky American Standard Kitchen Faucet Infinity
Related Posts