Replace Bathroom Ceiling Extractor Fan: A Comprehensive Guide
Maintaining a healthy and comfortable indoor environment is crucial, especially in areas like bathrooms that generate moisture and odors. A bathroom ceiling extractor fan plays a vital role in this regard by removing excess humidity, preventing mold growth, and ensuring proper ventilation.
Over time, extractor fans can become faulty or inefficient due to wear and tear, requiring replacement. Replacing a bathroom ceiling extractor fan is a relatively straightforward task that can be completed by most do-it-yourselfers with basic tools and a bit of patience.
Essential Aspects of Replacing a Bathroom Ceiling Extractor Fan
To ensure a successful replacement, it's essential to consider the following aspects:
- Safety First: Always turn off the power supply to the fan before starting any work. Ensure the circuit breaker is switched off and check that there is no power using a voltage tester.
- Gathering Tools and Materials: You'll need a screwdriver, wire cutters, electrical tape, a new extractor fan, and any additional materials specific to your model.
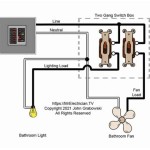
- Removing the Old Fan: Carefully remove the cover grill of the existing fan by unscrewing the screws or clips holding it in place. Disconnect the electrical wires, taking note of which wire connects to which terminal.
- Preparing the New Fan: Connect the electrical wires to the corresponding terminals on the new fan, following the color coding or instructions provided with the fan. Secure the connections with electrical tape.
- Installing the New Fan: Mount the new fan into the ceiling opening, ensuring it fits snugly and is properly aligned. Screw in the mounting screws to secure the fan in place.
- Restoring Power: Turn the power back on at the circuit breaker and test the fan to ensure it is functioning properly.
Additional Considerations
In addition to the essential steps outlined above, consider the following:
- Choose a fan with an appropriate airflow capacity (CFM) to meet the size of your bathroom.
- Install a humidity sensor switch to automatically turn on the fan when moisture levels rise.
- Clean the fan regularly to prevent dust accumulation and ensure optimal performance.
Replacing a bathroom ceiling extractor fan is a straightforward task that can greatly improve your bathroom's air quality and overall comfort. By following these guidelines and considering the additional recommendations, you can ensure a successful and effective replacement.

How To Install A Bathroom Fan Step By Guide Bob Vila

What Parts Do I Need To Install An Inline Fan In My Bathroom

Tips For Installing Or Replacing A Bathroom Fan Forbes Home

What Extractor Fan Do I Need For My Bathroom Blog World

Bathroom Extractor Fan Costs Calculator Quotes For 2024

Average Cost To Install A Bathroom Fan Forbes Home

How To Install An Extractor Fan In A Ceiling

How To Install An Extractor Fan

How To Fit An Extractor Fan In The Ceiling Homebase

How To Fit A Bathroom Extractor Fan Using Light Switch Installation Xpelair Dx100


