Replacing a Bathroom Sink Cartridge: A Step-by-Step Guide
Bathroom sink faucets are essential fixtures in any home, providing a convenient source of water for washing hands, brushing teeth, and other daily tasks. However, over time, these faucets can wear down, leading to leaks, drips, and other issues. One common culprit behind these problems is a faulty cartridge. Fortunately, replacing a bathroom sink cartridge is a relatively straightforward DIY project that can be completed with the right tools and instructions.
Understanding the Cartridge
The cartridge is a crucial component of your bathroom sink faucet, responsible for controlling the flow and temperature of the water. It consists of a ceramic disc that contains a series of small holes. When the faucet handle is turned, the disc rotates, adjusting the size of these holes and regulating the water flow. Over time, the ceramic disc can become worn or damaged, resulting in leaks or a reduced water flow. In addition, the internal components of the cartridge can become clogged with mineral deposits, preventing it from functioning properly.
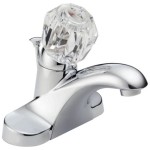
There are two main types of cartridges: single-handle and double-handle. Single-handle cartridges are typically used in faucets with a single lever for controlling both hot and cold water. Double-handle cartridges, on the other hand, are used in faucets with separate handles for hot and cold water. The specific type of cartridge you have will determine the replacement process.
Steps to Replace a Bathroom Sink Cartridge
Replacing a bathroom sink cartridge requires a few basic tools and a bit of patience. Here is a step-by-step guide:
- **Turn off the water supply.** Locate the shut-off valves for the hot and cold water lines connected to your bathroom sink. These valves are typically found beneath the sink or on the wall behind the sink. Turn the valves clockwise to completely shut off the water supply.
- **Drain the faucet.** Open the faucet to allow any remaining water in the lines to drain out. This will prevent water from leaking out during the replacement process.
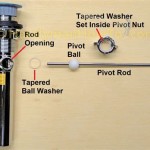
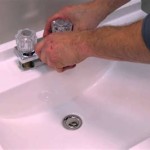
- **Remove the faucet handle.** Depending on the type of faucet, the handle may be held in place by a set screw, a cap nut, or a decorative cover plate. Carefully remove the handle to expose the cartridge assembly.
- **Unscrew the cartridge.** The cartridge is typically secured to the faucet body by a retaining nut. Use a wrench or pliers to unscrew the nut and remove the cartridge.
- **Install the new cartridge.** Carefully insert the new cartridge into the faucet body. Make sure the cartridge is properly aligned, and then tighten the retaining nut securely.
- **Reassemble the faucet.** Reinstall the handle, decorative cover plate, and any other components that were removed.
- **Turn on the water supply.** Slowly turn the shut-off valves counterclockwise to restore the water supply. Check for any leaks around the cartridge or other connections.
- **Test the functionality.** Turn the faucet handle to ensure the water flow and temperature are working properly.
Tips for Replacing a Bathroom Sink Cartridge
Here are some tips to ensure a successful cartridge replacement:
- **Identify the correct cartridge.** Before purchasing a replacement cartridge, it's crucial to identify the specific type of cartridge required for your faucet. You can find this information on the manufacturer's website or by consulting the faucet's manual.
- **Take photos or notes.** Before disassembling the faucet, take pictures or make notes of the components' locations and orientations. This will help you reassemble the faucet correctly.
- **Clean the faucet body.** Before installing the new cartridge, clean the faucet body and any surrounding areas to remove any debris or mineral deposits. This will help ensure a clean and leak-free installation.
- **Use plumber's tape.** Apply plumber's tape to the threads of the retaining nut before installing the cartridge. This will help create a tight seal and prevent leaks.
- **Don't overtighten.** When tightening the retaining nut, avoid overtightening it, as this can damage the cartridge or faucet body.

Bathroom Faucet Cartridge Replacement

How To Replace Repair A Leaky Moen Cartridge In Bathroom Set Of Faucets Single Lever Tips

American Standard 994053 0070a Valve Cartridge Replacement Part Faucetdepot Com

How To Replace Leaky Cartridges In A Bathroom Faucet Repair

Brass Bathroom Sink Faucet Valve Stem 2pcs Hot And Cold Ceramic Disc Repair Cartridge Replacement Kitchen Com

Old House Handyman Fixing Leaky Faucet Turns Into Family Affair

Replace Bathroom Faucet Cartridge Doityourself Com Community Forums

What Is A Toilet And Sink Cartridge

How To Fix A Leaky Faucet Forbes Home

How To Fix A Leaky Faucet Guides For Every Design And Style
Related Posts