Replace Bathroom Sink Water Supply Lines: A Comprehensive Guide
Maintaining functional bathroom fixtures requires regular inspection and maintenance, and replacing water supply lines is an essential aspect of this upkeep. Aging or damaged water supply lines can lead to leaks, reduced water pressure, and potential water damage. Replacing them proactively ensures a reliable and efficient water supply to your bathroom sink.
This comprehensive guide will provide step-by-step instructions on replacing bathroom sink water supply lines. Follow these steps carefully to ensure a secure and leak-free installation.
Step 1: Prepare and Gather Materials
Before you begin, gather the following materials: new water supply lines, adjustable wrench, pliers, bucket or towels, and Teflon tape or pipe dope.
Step 2: Turn Off Water Supply
Locate the water shut-off valves beneath the sink and turn them clockwise to close. Verify that the water supply is turned off by opening the faucet and checking if water flows.
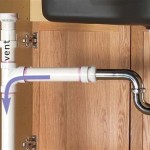
Step 3: Disconnect Old Water Supply Lines
Use the adjustable wrench to loosen the nuts connecting the old water supply lines to the sink faucet and water shut-off valves. Place a bucket or towels beneath the connections to catch any residual water.
Step 4: Measure and Cut New Water Supply Lines
Measure the distance between the sink faucet and water shut-off valves to determine the appropriate length for the new water supply lines. Use pliers to cut the lines to the desired length.
Step 5: Apply Teflon Tape or Pipe Dope
Apply several layers of Teflon tape or pipe dope to the threaded ends of the new water supply lines. This sealant will help create a tight seal and prevent leaks.
Step 6: Connect New Water Supply Lines
Hand-tighten the new water supply lines to the sink faucet and water shut-off valves. Use the adjustable wrench to further tighten the connections, but avoid overtightening.
Step 7: Turn On Water Supply
Slowly turn on the water shut-off valves and check for leaks around the connections. Tighten any loose connections as needed.
Step 8: Check for Leaks
Run water through the sink faucet for several minutes and inspect all connections for leaks. If you notice any leaks, tighten the connections further or apply additional Teflon tape or pipe dope.
Conclusion
Replacing bathroom sink water supply lines is a relatively straightforward task that can be completed in about 30 minutes. By following these steps and using the proper materials, you can ensure a secure and leak-free water supply to your bathroom sink.

Replace Bathroom Sink Water Supply Lines

How To Replace A Faucet Water Supply Line Install Fluidmaster S Seal

How To Replace Bathroom Water Supply Lines Home Repair Tutor

Replace Bathroom Sink Water Supply Lines

Sink Faucet Water Supply Line Replacement Ifixit Repair Guide

Fitting A Bathroom Sink Or Bidet Step By Guide And

How To Tighten Water Supply Line Connectors Diy Family Handyman

How To Replace Water Supply Line Plumbing Bathroom Sink Faucets Diy

Plumbing Repairs How To Repair Fix It Diy Install Bathroom Sink

How To Replace A Bathroom Faucet Tinged Blue