Replacing a Bathroom Ventilation Fan Motor
A bathroom ventilation fan is a crucial component of maintaining a healthy and comfortable home environment. The fan efficiently removes moisture, odors, and airborne pollutants, preventing mold growth, mildew formation, and the accumulation of stale air. When a fan motor malfunctions, the entire system becomes ineffective, compromising indoor air quality and potentially leading to more significant issues. Understanding how to replace a bathroom ventilation fan motor is essential for homeowners who wish to ensure their ventilation system's proper functioning.
Understanding the Importance of a Working Fan Motor
The bathroom ventilation fan motor is the heart of the system. It is responsible for powering the fan blades, drawing in air from the bathroom and expelling it outside. This constant airflow is critical for several reasons:
-
Moisture Removal:
Bathrooms generate significant moisture during showers and baths. Without proper ventilation, this moisture can condense, leading to mold and mildew growth on surfaces and within the walls. These organisms can cause respiratory issues, allergies, and damage to the structure of your home. -
Odor Control:
Bathroom odors can be unpleasant and linger in the air if not properly ventilated. The fan helps remove these odors, keeping your home smelling fresh and clean. -
Airborne Pollutant Removal:
Showering and bathing can release pollutants such as hairspray, cleaning products, and other chemicals into the air. The ventilation fan helps remove these contaminants, improving indoor air quality and reducing the risk of health problems.
When the fan motor fails, these essential functions are compromised, creating a breeding ground for bacteria and potentially leading to more significant health issues. In addition, replacing a faulty motor is often more cost-effective than replacing the entire ventilation fan unit, making it a worthwhile repair.
Steps Involved in Replacing the Fan Motor
Replacing a bathroom ventilation fan motor is a relatively straightforward DIY project for those comfortable working with basic tools and electrical components. Here are the steps involved:
-
Turn Off the Power:
Before starting any work, always disconnect the power supply to the fan by flipping the corresponding breaker in your electrical panel. -
Remove the Fan Cover:
Using a screwdriver, carefully remove the cover of the ventilation fan. This may involve loosening screws or clips depending on the model. -
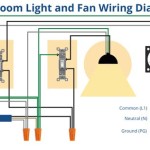
Disconnect the Wiring:
Identify the wires connected to the motor and carefully disconnect them. Use a wire stripper to expose the wires and make note of the color codes for easy reconnection later. -
Remove the Old Motor:
Once the wiring is disconnected, unscrew or unclip the old motor from its housing. Make sure to remove the motor housing from the fan blade assembly as well. -
Install the New Motor:
Align the new motor with the housing and secure it using the original screws or clips. Ensure the motor sits firmly in place and the fan blades are positioned correctly. -
Reconnect the Wiring:
Connect the wires to the new motor, paying close attention to the color codes. Match the wires to their corresponding terminals on the new motor. -
Test the Motor:
After reconnecting the wiring, turn the power back on to the fan and test the new motor. Ensure it rotates smoothly and the fan is functioning correctly. -
Reinstall the Cover:
Reinstall the cover of the ventilation fan, ensuring it is securely fastened.
Tips for Selecting the Right Replacement Motor
When choosing a replacement motor, it's crucial to select one specifically designed for your bathroom ventilation fan model. Here are some important factors to consider:
-
Voltage:
The voltage of the new motor should match the old motor's voltage. This information is usually printed on the old motor or the fan housing. -
Horsepower:
The horsepower rating of the new motor should be comparable to the old motor. A higher horsepower rating may provide more powerful airflow, but it could also be more energy-intensive. -
Size and Shape:
The new motor should fit within the existing housing and be compatible with the fan blade assembly. -
RPM (Revolutions per Minute):
The RPM of the new motor should be similar to the old motor. This ensures the fan operates at the correct speed and provides the desired airflow.
Replacing a bathroom ventilation fan motor is a relatively simple task for homeowners with basic DIY skills, and it can significantly enhance indoor air quality, preventing health problems and extending the lifespan of your ventilation system.

Bojack Bathroom Vent Exhaust Fan Motor Replacement Electric Motors Kit Compatibl

How To Install Clean A Bathroom Fan

Bathroom Fan Motor Replacement Electric Exhaust Ventilation Bath Blower Vent Kit 816325011627

How To Replace Bathroom Exhaust Fan Motor

Universal Security Instruments Bf 70ma Motor Assembly Replacement Part For 70 Cfm Bathroom Fans

Broan Metal Replacement Bath Fan Motor In The Bathroom Parts Department At Com

Universal Bathroom Vent Fan Motor Replacement Electric Motors Kit Sm550 Compatible With Nutone Broan 50 Cfm120v Replace C01575 65100 Em550 Em750 Ca

Broan Nutone Quickit 60 Cfm 2 5 Sones 10 Minute Bathroom Exhaust Fan Upgrade Kit Qkn60s The Home Depot

Nebraska Energy Quarterly December 2024

C350bn Nutone Bathroom Fan Motor Asm For 696n B Unit Replacement 26715178834
Related Posts