Essential Aspects of Replacing Bathroom Recessed Lighting
Recessed lighting is a versatile and popular choice for bathrooms, providing ample illumination while enhancing the space's ambiance. However, as with any fixture, recessed lighting may eventually require replacement due to wear and tear, outdated technology, or aesthetic changes. Replacing bathroom recessed lighting involves several key steps that ensure a successful outcome.
Assessing the Situation:
Before embarking on the replacement process, it's crucial to assess the situation thoroughly. Determine the type of recessed lighting currently installed, such as halogen, incandescent, LED, or fluorescent. Verify the voltage, wattage, and beam angle to ensure compatibility with the desired replacements.
Choosing the Right Replacements:
Consider several factors when selecting replacement recessed lighting. Energy efficiency is paramount, with LED options providing significant savings over traditional incandescent bulbs. The size and shape of the existing cutouts will dictate the compatibility of the new fixtures. Additionally, consider the desired light output, color temperature, and trim style to complement the bathroom's decor.
Safety Precautions:
Electrical work always requires caution. Turn off the power at the circuit breaker or fuse box before starting any electrical work. If unsure about any aspect of the replacement process, it's advisable to consult a qualified electrician.
Removing the Old Fixtures:
Disconnect the old fixtures from the electrical wires by carefully unscrewing the wire nuts. Remove the trim by gently prying it loose from the ceiling. Pull the old housing out of the ceiling, being mindful not to damage the drywall or insulation.
Installing the New Fixtures:
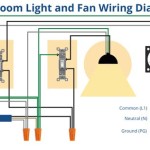
Insert the new housing into the ceiling cutout and secure it with screws. Connect the electrical wires to the new fixture, ensuring proper polarity (black to black, white to white, and ground to green or bare copper). Push the trim into place and secure it with screws or springs.
Turning the Power On:
Once all fixtures are securely installed, turn on the power at the circuit breaker or fuse box. Check each light to verify proper operation. If any issues arise, such as flickering or buzzing, turn off the power immediately and consult an electrician.
Additional Tips:
Consider using a junction box to connect multiple recessed lights, simplifying the wiring process. Insulation covers around the recessed housings help prevent air leaks and improve energy efficiency. If the old fixtures had thermal protection devices, be sure to install new ones with the replacements.
Replacing bathroom recessed lighting can be a straightforward task with the right preparation and attention to safety. By taking these essential aspects into account, homeowners can ensure a successful replacement that enhances the functionality, aesthetics, and ambiance of their bathroom.

Bathroom Recessed Lighting Tips 1stoplighting

Bathroom Recessed Lighting Tips 1stoplighting

Recessed Lights Above Vanity

Potlight Layout Tips In The Bathroom Mr

What You Need To Know About Pot Lights Or Recessed Lighting

Potlight Layout Tips In The Bathroom Mr

Recessed Lighting In A Bathroom Modern

Recessed Lighting For Your Bathroom Modernize

Bathroom Lighting

Choosing Recessed Shower Lights 1000bulbs Blog
Related Posts