Essential Aspects of Resurfacing a Bathroom Sink DIY
Resurfacing a bathroom sink is a cost-effective way to give it a fresh look without having to replace the entire fixture. However, to achieve a successful resurfacing project, it is essential to pay attention to several key aspects, including surface preparation, material selection, and application technique.
In this article, we will delve into the essential aspects of resurfacing a bathroom sink DIY, providing detailed guidance on how to approach each step of the process. By following these essential aspects, you can ensure a durable and aesthetically pleasing result that will enhance the overall appearance of your bathroom.
Surface Preparation
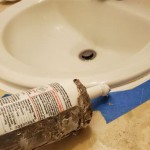
Surface preparation is a crucial aspect of bathroom sink resurfacing, as it ensures that the new surface will properly adhere to the existing one. Start by thoroughly cleaning the sink with a degreaser to remove any dirt, oil, or soap scum.
Once the sink is clean, sand it lightly with fine-grit sandpaper to create a slightly rough surface. This will help the new coating to bond better. Be sure to wear a dust mask when sanding to avoid inhaling harmful particles.
Material Selection
The type of material you choose for resurfacing will depend on your budget, desired finish, and the condition of the existing sink. Porcelain and acrylic are two of the most popular materials used for bathroom sink resurfacing.
Porcelain is a durable and chip-resistant material that can be applied over a variety of surfaces. Acrylic is a less expensive option that is easy to apply and comes in a wide range of colors.
Application Technique
When applying the resurfacing material, it is important to follow the manufacturer's instructions carefully. Generally, you will need to apply multiple coats of the material, allowing each coat to dry completely before applying the next.
Use a brush or roller to apply the material in even strokes, and be sure to avoid drips or runs. Once the final coat has been applied, allow it to cure for the recommended amount of time before using the sink.

Resurfacing An Old Sink Diy Oak Hill Home Solutions

How To Refinish Bathroom Vanity Top With Diy Resin Thediyplan

Homax Tub Sink Tile Resurfacing Kit Bathroom Diy Pink Bathtub

Paint Bathroom Vanity Countertop Sink So Easy A Piece Of Rainbow

Paint Bathroom Vanity Countertop Sink So Easy A Piece Of Rainbow

Diy Concrete Counter Overlay Vanity Makeover

Fluted Bathroom Cabinet Refacing Diy At Home With Ashley

Get A Grip Resurfacing Bathroom Countertops Cleaning Marble Cultured Shower Walls

Fluted Bathroom Cabinet Refacing Diy Doors Cabinets Vanity

Rustoleum Tub And Tile Refinishing Kit Diy Sink Resurfacing Re How To Paint Your
Related Posts