Essential Aspects of Rough-In Plumbing for Bathroom Addition
Rough-In Plumbing for Bathroom Addition plays a crucial role in any bathroom addition project. Neglecting these crucial aspects can jeopardize the functionality, safety, and structural integrity of the newly added bathroom. Understanding the essential aspects of Rough-In Plumbing is paramount to ensure a successful and durable bathroom addition.The term "Rough-In Plumbing" refers to the initial stage of plumbing installation that establishes the fundamental framework for water supply and drainage systems. It involves the installation of essential components such as water pipes, drainpipes, fittings, and fixtures. These components are installed before drywall and other finishing materials are put in place.
### Essential Aspects of Rough-In Plumbing: 1.Water Supply Pipes:
- Determine the location of water fixtures (sinks, toilets, showers) and plan the layout of water supply pipes accordingly. - Ensure proper pipe sizing to handle the expected water flow rate. - Use appropriate materials (copper, PEX, CPVC) based on code requirements and specific needs. 2.Drainage Pipes:
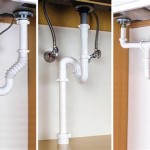
- Install drainpipes with the correct slope to ensure proper drainage and prevent clogs. - Choose appropriate pipe materials (PVC, ABS) that meet building codes and withstand potential chemical exposure. - Plan the location of drain openings and connect them to the main drainage system. 3.Fixture Placement:
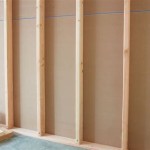
- Establish the exact location of fixtures (sinks, toilets, showers) based on design plans and ergonomic considerations. - Ensure proper spacing between fixtures for accessibility and functionality. - Install blocking or reinforcement in walls to support the weight of fixtures and prevent movement. 4.Venting:
- Install vent pipes to allow air to escape from the drainage system, preventing traps from siphoning and ensuring proper drainage. - Size and locate vent pipes according to code requirements to maintain atmospheric pressure balance. 5.Shut-Off Valves:
- Install shut-off valves at each fixture for easy water isolation during repairs or emergencies. - Place shut-off valves in accessible locations for easy maintenance. 6.Inspection and Testing:
- Schedule inspections by a qualified plumber or building inspector to ensure code compliance and proper installation. - Conduct pressure tests and flow tests to verify the integrity and functionality of the plumbing system. Understanding and addressing these essential aspects of Rough-In Plumbing is crucial for a successful bathroom addition. Considering these factors before beginning the renovation ensures a functional, safe, and durable bathroom addition that meets your needs and expectations.
How To Plumb A Basement Bathroom Diy Family Handyman

Plumbing Rough In For Your New Home Builder Tips Quality Armchair Blog Build Renovate Repair Own Save Money As An Owner

What Does A Bathroom Plumbing Diagram For Rough In Look Like Quora

How To Do A Plumbing Rough In Pro Tool Reviews

Pin On Bathroom Remodeling

Rough In Plumbing Plumb Tech

Proper Ways To Relocate Plumbing When Renovating A Bathroom Kevin Szabo Jr Services Local Plumber Tinley Park Il

Basement Bathroom Plumbing Planning For A Below Grade Lavatory

How To Finish A Basement Bathroom Pex Plumbing

Bathroom Layout Specs Better Homes Gardens Shower Plumbing Diagram