Running PEX to Bathroom Sink: A Comprehensive Guide
Renovating a bathroom can be a rewarding task, and plumbing plays a crucial role in ensuring a functional and aesthetically pleasing space. Running PEX to a bathroom sink is a common task that requires proper planning and execution. This guide will provide you with all the essential aspects you need to know to successfully run PEX to your bathroom sink.
Materials Required
Before starting, gather the necessary materials:
- PEX tubing
- PEX fittings (elbows, tees, connectors)
- PEX cutter
- PEX crimping tool
- Wrenches
- Shut-off valves
- Faucet
- Plumber's tape
Planning and Preparation
Start by locating the water supply lines in your bathroom. Identify the hot and cold lines and mark the location of the new sink. Determine the length of PEX tubing you need and measure it carefully.
Running the PEX
Cut the PEX tubing to the measured length using a PEX cutter. Ensure the cuts are clean and perpendicular to the tubing. Insert the PEX tubing into the fittings and fully insert the crimping ring. Use the PEX crimping tool to secure the fittings firmly.
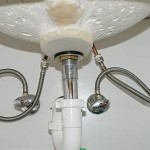
Connecting to Water Supply Lines
Locate the shut-off valves on the existing water supply lines. Turn off both the hot and cold water supply and open the faucet to release any residual water. Connect the PEX tubing to the shut-off valves using PEX fittings and crimping rings.
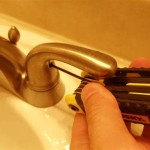
Connecting to the Faucet
Wrap plumber's tape around the threaded ends of the faucet. Connect the PEX tubing to the faucet's water supply lines using PEX fittings and crimping rings. Tighten the connections securely.
Testing and Finishing
Turn on the shut-off valves to allow water to flow through the PEX lines. Check for any leaks at the connections. If there are no leaks, the installation is complete. Install the faucet and finish the sink installation.
Tips for Success
- Use high-quality PEX tubing and fittings for durability.
- Ensure all cuts are clean and perpendicular to prevent leaks.
- Crimp the fittings securely using the proper crimping tool.
- Open faucets after turning on the water supply to release any air trapped in the lines.
- If you encounter any leaks, re-tighten the connections or replace the fittings.

What You Need To Know About Pex Plumbing Pipe Family Handyman

How To Run Pex Pipe A Vanity From The Main Water Line

How To Finish A Basement Bathroom Pex Plumbing

How To Install Pex Pipe A Bathroom Sink Pkb Cabinetry

What You Need To Know About Pex Plumbing Pipe Family Handyman

Bathroom Sink Pex Water Line Stub Out Drain Photo Master Bath Shower

Plumber Tips Everything You Need To Know About Pex Piping Granbury Tx Benjamin Franklin Plumbing

Wall Shut Off For Pex Distribution Internachi Forum

Plumbing With Pex Tubing Diy Installation

Plumbing Progress Pex Bathroom Rough In Started Diy Installation