Rv Bathroom Sink Replacement: Essential Aspects
Replacing an RV bathroom sink is a task that requires attention to essential aspects including choosing the right sink, preparing for the replacement, removing the old sink, installing the new sink, and finishing touches. Overlooking any of these aspects can lead to difficulties during the replacement process or affect the functionality and aesthetics of the new sink.
This article will delve into each of these aspects, providing guidance on how to approach them effectively. Whether you're a seasoned RV enthusiast or a first-timer tackling an RV bathroom renovation, understanding these essential aspects will help ensure a successful and satisfactory sink replacement experience.
Choosing the Right Sink
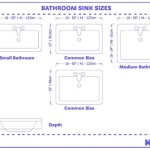
Selecting the right sink for your RV bathroom is crucial. Consider the size, shape, and material of the sink, taking into account the available space, your personal preferences, and the overall design of the bathroom. Different materials, such as porcelain, stainless steel, and composite materials, offer varying durability, ease of cleaning, and aesthetic appeal.
Preparing for the Replacement
Before embarking on the replacement process, it's essential to prepare the bathroom by clearing out all items from the sink area, removing any accessories or fixtures, and turning off the water supply. Gather the necessary tools and materials, including a wrench, screwdriver, caulk gun, and sealant.
Removing the Old Sink
Disconnect the water supply lines and drain lines connected to the old sink. Remove the mounting hardware that secures the sink to the countertop and lift the sink straight up to detach it.
Installing the New Sink
Apply a bead of caulk around the base of the new sink and place it in the cutout on the countertop. Secure the sink with mounting hardware and reconnect the water supply and drain lines. Check for leaks by turning on the water and inspecting the connections.
Finishing Touches
After installing the new sink, apply a bead of caulk around the edge where the sink meets the countertop to create a watertight seal. Reattach any accessories or fixtures, such as the faucet and drain plug, and restore the bathroom to its original state.

How To Squeeze More Space Out Of A Tiny Rv Bathroom Artofrv Com

Rv Bathroom Sink Replacement

Rv Bathroom Sinks

How Not To Replace An Rv Bathroom Faucet

Rv Bathroom Faucet Replacement John Marucci On The Road

How To Squeeze More Space Out Of A Tiny Rv Bathroom Artofrv Com

10 Easy Diy Rv Bathroom Renovation Ideas Love

Single Bowl Rv Bathroom Sink 14 7 8 Long X 12 3 Wide White Jr S Sinks 37295351

Acorn To Oak Rv Bathroom Makeover

Top 5 Rv Bathroom Sinks Ideas For Inspiration Freshouz Home Architecture Decor Sink Trailer