Self-Install Bathroom Vanity: A Step-by-Step Guide to Success
Upgrading your bathroom vanity is a transformative project that can elevate the aesthetics and functionality of your space. While hiring a professional installer is always an option, many homeowners with basic DIY skills can successfully tackle this task themselves. Here's a comprehensive guide to help you navigate the process seamlessly.
1. Planning and Preparation
Before you embark on your installation, gather all necessary materials and tools, including a new vanity, sink, faucet, mirror, and any necessary hardware. Ensure your new vanity fits the designated space by measuring carefully and comparing dimensions. Additionally, gather tools like a level, screwdriver, wrench, and adjustable wrench.
2. Removing the Old Vanity
Disconnect the water supply and drain lines from the sink. Remove the faucet handles and drain stopper. Use a screwdriver or wrench to detach the vanity from the wall or floor. Lift the vanity carefully and remove it from the room. If you encounter any stubborn fixtures, gently tap them with a rubber mallet or use a penetrating lubricant.
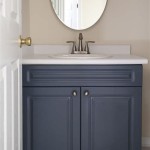
3. Installing the New Vanity
Place the new vanity in the intended location and secure it to the wall or floor using screws or bolts. Ensure the vanity is level by adjusting the legs or feet. Connect the water supply and drain lines to the sink, tightening the connections securely. Install the faucet handles and drain stopper.
4. Installing the Sink
Apply a bead of plumber's putty around the rim of the sink drain opening. Carefully insert the sink into the vanity top opening, aligning it properly. Apply pressure around the edges to ensure a tight fit. If the sink does not fit snugly, adjust the putty as needed.
5. Installing the Mirror
Determine the desired height and position of the mirror above the vanity. Mark the mounting points and use a level to ensure accuracy. Apply adhesive mounting strips or hang the mirror using screws or nails. Secure the mirror firmly in place.
6. Finishing Touches
Caulk the gaps between the sink, vanity top, and wall to prevent water damage. Allow the caulk to dry completely. Install the drawer pulls or knobs and any other decorative elements. Double-check all connections and make sure everything is secure before using the vanity.
Tips for Success
* Measure twice, cut once. Accuracy is crucial to ensure a proper fit. * Double-check all connections for leaks before using the vanity. * Use a level to ensure that the vanity and sink are installed level. * Caulk all gaps to prevent water damage. * If you encounter any unforeseen difficulties, don't hesitate to consult a professional plumber or handyman.
How To Build A Diy Bathroom Vanity Angela Marie Made

How To Build A Diy Bathroom Vanity Angela Marie Made

Diy Bathroom Floating Vanity With Drawers Hydrangea Treehouse

How To Install A Bathroom Vanity

Diy Bathroom Floating Vanity With Drawers Hydrangea Treehouse

Diy Bathroom Vanity 12 Rehabs Bob Vila

How To Diy A Bathroom Vanity Unit Wood Create

Diy Bathroom Vanity 12 Rehabs Bob Vila

10 Diy Bathroom Vanity Ideas The Family Handyman
:max_bytes(150000):strip_icc()/build-something-diy-vanity-594402125f9b58d58ae21158.jpg?strip=all "16 Diy Bathroom Vanity Plans You Can Build Today")
16 Diy Bathroom Vanity Plans You Can Build Today
Related Posts