Tile Over Bathroom Vanity: Upgrading Your Bathroom's Style and Functionality
If you're looking to give your bathroom a new look and enhance its functionality, installing tiles over your bathroom vanity is a brilliant option. This simple yet effective upgrade can add a touch of elegance, create a cohesive design, and offer several practical benefits. In this guide, we'll explore the essential aspects of tiling over your bathroom vanity, including its advantages, considerations, and step-by-step process.
Advantages of Tiling Over Bathroom Vanity
1. Enhanced Aesthetics: Tiling provides a wide array of design possibilities, allowing you to create a customized look that complements your bathroom's style. From classic ceramic tiles to modern glass tiles, you can choose from various colors, textures, and patterns to achieve the desired aesthetic.
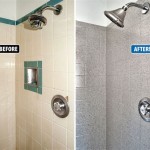
2. Improved Durability: Tiles are known for their resilience and durability. They can withstand moisture, heat, and daily wear and tear, making them ideal for high-traffic areas like bathrooms. Unlike vanities made of wood or laminate, tiles won't warp, rot, or deteriorate over time.
3. Easy Maintenance: Tiles are incredibly easy to clean and maintain. Regular sweeping and mopping with a mild detergent are sufficient to keep them looking their best. Tiles are non-porous, so they don't harbor dirt or bacteria, promoting a healthier and more hygienic bathroom environment.
4. Increased Value: Tiling your bathroom vanity adds value to your home. Potential buyers appreciate the durability, low-maintenance nature, and aesthetic appeal of tiled vanities, which can increase your home's overall value and appeal.
Considerations Before Tiling Your Bathroom Vanity
1. Surface Preparation: Ensure that the vanity's surface is level, stable, and free from any damage or imperfections. If necessary, repair or reinforce the vanity to provide a solid base for the tiles.
2. Tile Selection: Choosing the right tiles is crucial. Consider factors such as the tile's size, shape, color, texture, and material. Make sure the tiles are suitable for bathroom use and can withstand moisture and humidity.
3. Grout Selection: Grout is the material used to fill the gaps between tiles. Choose a grout color that complements the tiles and the overall design of your bathroom. Consider using a stain-resistant grout to minimize discoloration and maintenance.
4. Waterproofing: Before tiling, ensure the vanity's surface and surrounding areas are properly waterproofed. This will prevent moisture from seeping behind the tiles and causing damage to the vanity or wall.
Step-by-Step Process of Tiling Your Bathroom Vanity
1. Prepare the Surface: Clean the vanity's surface thoroughly and remove any dirt, grease, or debris. If necessary, sand the surface to create a smooth and even base.
2. Apply Waterproofing: Apply a waterproof membrane or sealant to the vanity's surface and surrounding areas. This will create a barrier against moisture and prevent damage.
3. Install Cement Board: If the vanity's surface is not already made of a suitable backing material, install a cement board over it. Cement board provides a stable and level base for the tiles.
4. Apply Thinset Mortar: Spread a thin layer of thinset mortar over the cement board using a notched trowel. The thinset mortar will help bond the tiles to the surface.
5. Lay the Tiles: Starting from a corner, begin laying the tiles onto the thinset mortar. Press each tile firmly into place, making sure it is level and aligned with the adjacent tiles.
6. Allow the Thinset Mortar to Cure: Let the thinset mortar cure for the recommended time specified by the manufacturer. This will ensure a strong bond between the tiles and the surface.
7. Apply Grout: Once the thinset mortar has cured, apply grout to the spaces between the tiles. Use a grout float to spread the grout evenly and press it into the gaps. Allow the grout to dry according to the manufacturer's instructions.
8. Clean the Tiles and Grout: After the grout has dried, clean the tiles and grout with a damp sponge to remove any excess residue. Use a non-abrasive cleaner to avoid damaging the tiles or grout.
By following these steps and taking the necessary precautions, you can successfully tile over your bathroom vanity, transforming it into a stylish and functional focal point of your bathroom.
62 Bathroom Backsplash Ideas For A Stylish Makeover Remodel Tile Vanity

Bathroom Design Getting Tile Around The Vanity Right

Tiled Bathroom Vanity Remodel Decor Countertops

Bathroom Design Getting Tile Around The Vanity Right
:max_bytes(150000):strip_icc()/milesminnophotography_118311492_318343026165812_2272495376046156320_n-669492e1adc2421491187072dc287d7e.jpg?strip=all "62 Beautiful Bathroom Tile Ideas For Walls Floors And More")
62 Beautiful Bathroom Tile Ideas For Walls Floors And More

How To Drill Into Tile Hang Things Maison De Pax

Bathroom Design Getting Tile Around The Vanity Right American Cabinet Flooring Inc

Master Bathroom Vanity Makeover Centsational Style

Brown Bath Vanity With White Vertical Tiles Transitional Bathroom

Ceramic Tile Bathroom Countertops
Related Posts