Water Leaking From Bathroom Sink Handle: Causes and Solutions
A leaking bathroom sink handle is a common plumbing issue that can waste water and increase your utility bills. While it may seem like a minor inconvenience, ignoring a leaking handle can lead to more serious problems down the road. In this article, we'll explore the common causes of water leaking from bathroom sink handles and provide step-by-step instructions on how to fix them yourself.
Causes of Leaking Bathroom Sink Handles
There are several potential causes for a leaking bathroom sink handle, including:
- Worn or damaged O-rings: O-rings are small rubber gaskets that create a seal between the handle and the faucet body. Over time, O-rings can wear out or become damaged, allowing water to leak.
- Loose handle screws: The screws that hold the handle in place can become loose, causing the handle to wobble and allowing water to leak around it.
- Damaged cartridge or stem: The cartridge or stem is the main component inside the handle that controls the flow of water. If the cartridge or stem is damaged, it can cause water to leak.
- Corroded or cracked faucet body: The faucet body can become corroded or cracked over time, creating a leak path for water.
How to Fix a Leaking Bathroom Sink Handle
Depending on the cause of the leak, you may be able to fix it yourself using the following steps:
1. Gather your tools
You will need:
- Adjustable wrench
- Allen wrench or hex key
- Phillips screwdriver
- Replacement O-rings (if needed)
- Faucet grease
2. Turn off the water supply
Locate the water supply valves under the sink and turn them off to prevent water from flowing into the faucet.
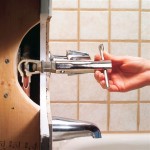
3. Remove the handle
Use the Allen wrench or hex key to remove the screw that secures the handle to the faucet body. Pull the handle straight up to remove it.
4. Inspect the O-rings
Examine the O-rings for any signs of wear or damage. If the O-rings are damaged, you will need to replace them.
5. Tighten loose screws
Use the adjustable wrench to tighten any loose screws that hold the handle in place.
6. Lubricate the handle and O-rings
Apply a small amount of faucet grease to the O-rings and the threads of the handle. This will help to create a watertight seal and prevent future leaks.
7. Reassemble the handle
Insert the handle into the faucet body and secure it with the screw. Tighten the screw until it is snug but do not overtighten.
8. Turn on the water supply
Turn the water supply valves back on and check for leaks. If there is still a leak, you may need to replace the cartridge or stem.
If you are unable to fix the leaking bathroom sink handle on your own, it is recommended to contact a qualified plumber for assistance.

5 Reasons Your Faucet Is Dripping Water How To Fix It

Simple Ways To Fix A Leaky Delta Bathroom Sink Faucet

How To Fix A Bathroom Faucet 14 Steps

5 Reasons Your Faucet Is Dripping Water How To Fix It

How To Fix A Bathroom Faucet 14 Steps

How To Fix A Leaky Bathroom Sink Faucet

How To Fix A Leaky Faucet 5 Easy Steps

Faucet Leak Repairs In Doylestown Upper To Mid Bucks County Cooper Mechanical

How To Fix A Leaky Faucet Handle 12 Steps With Pictures

How To Fix A Leaky Faucet True Value
Related Posts